How to Add a Product to V-Sample
This help sheet will talk you through how to use TechnoLogo to upload a product with an image attached.
IMPORTANT NOTE: When using the method outlined in this help sheet, you must ensure that images you opt to use end in the file extension ‘.jpg’. Additional steps for images ending in other extensions will be added to the bottom of the sheet.
STEP 1
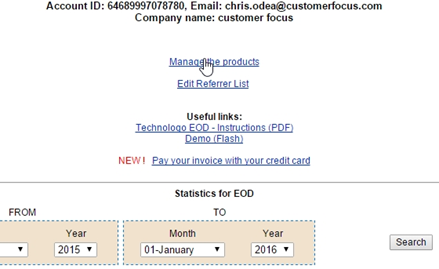
First, you need to log into TechnoLogo as you usually would. The login portal will look something like this

STEP 2
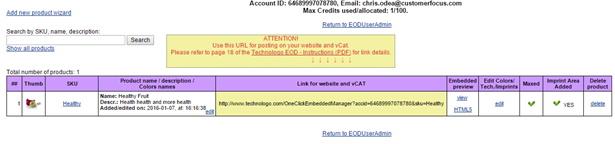
Once logged into the system, click on the ‘Manage the Products’ button just under your login details
STEP 3
On the products list, you will see a link in the top left corner labelled ‘Add New Product Wizard’. Click on this and a separate window will open.
STEP 4
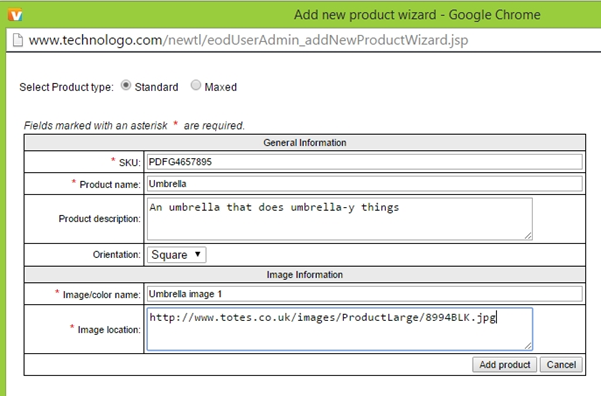
This is where you need to enter all the details for your new product. Start by adding the standard details such as SKU and description

STEP 5
Once at the stage where you need to enter an ‘image location’ it’s time to grab the address for your image. It is important to note that:
- If you want to upload a file that is currently saved to your PC, this must be hosted online first. There are many free file hosting services available online that you can use, such as Imgur and Filedropper. However, be aware that sites like this usually carry a ‘hit limit’ before the file is rendered inaccessible, and this limit can be reached purely by having the image display on another page (such as TechnoLogo). With this in mind, if you need to host a file online to use it is best to consult your IT department to see which hosting solution they would recommend/prefer.
To add an image that is hosted, navigate to the web page displaying the image and right-click on it. Depending on the browser you use, you will see a slightly differently worded option:
Chrome: ‘Copy Image Address’

Firefox: ‘Copy Image Location’
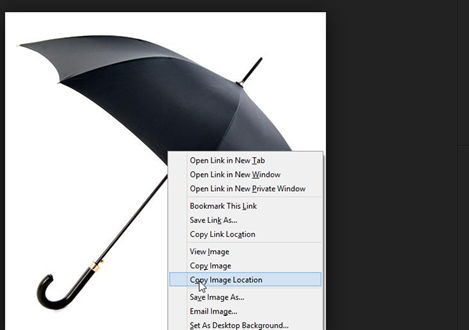
Internet Explorer: ‘Properties’ -> Copy the line of text next to ‘Address (URL)’

STEP 6
Now the image location has been added, take this opportunity to double-check the details you have entered. Once you’re happy, click the ‘Add Product’ button to the bottom-right of the screen
STEP 7
You will be able to tell that your image has been added successfully as the next page will feature that image, and ask if you wish to remove a logo from the image provided.

This image is now ready to be used with your V-sample product.
Wrong Extension?
If you want to use a specific file but this ends in a different file extension (for example .png or .bmp) you can still use this, you simply need to alter the extension first. You can do this by opening the image in paint, then going to ‘File’ -> ‘Save as…’
On Windows 7 or below: When in the ‘Save As’ file explorer window, click the drop down next to ‘file type’ and select ‘JPEG’
On Windows 8 or above: When hovering over the ‘Save as’ button a number of options will appear to the right. Click the one that says ‘Save as JPEG file’ then complete the process as you would for normally saving a file.
Bear in mind that doing this will only give you a local copy of the file, so you will have to host the image online following the conversion. Again, if you are unsure which method to use for this consult your IT department, as they may have a preferred file hosting solution for your business.
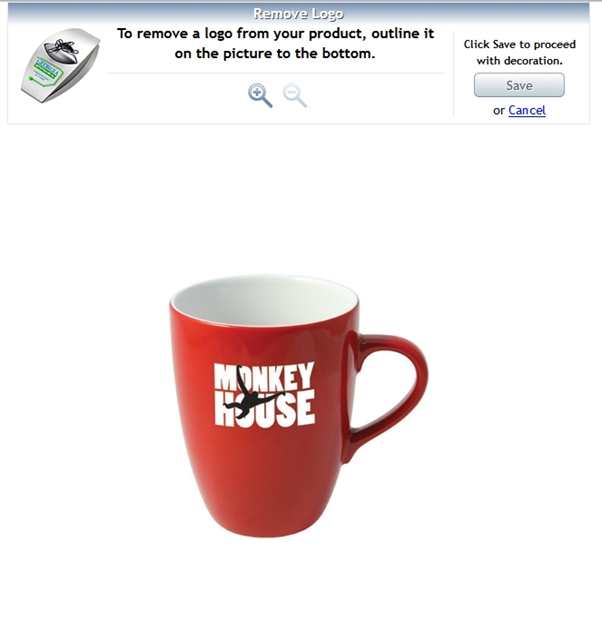
STEP 8
If your product contains a logo, you can click yes on this screen to be taken to the logo removal tool, which will appear something like this
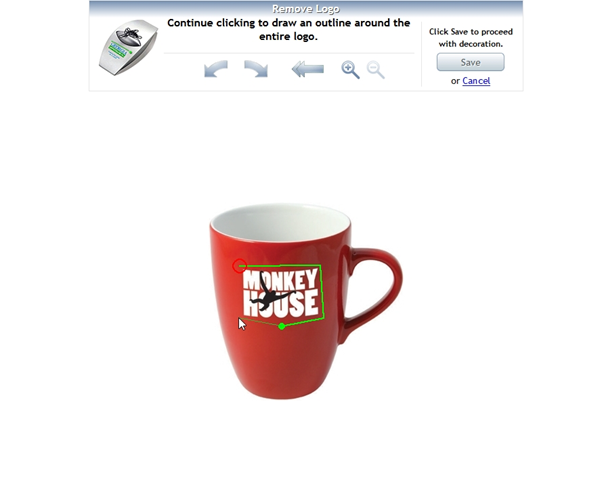
STEP 9
TO remove a logo, use the tool to draw a box around your logo, clicking once for each corner then drawing lines, like so
STEP 10
Once you have joined the lines (clicking within the red circle at the beginning of the shape) the tool will pull out any logos within that area, leaving you with a plain product
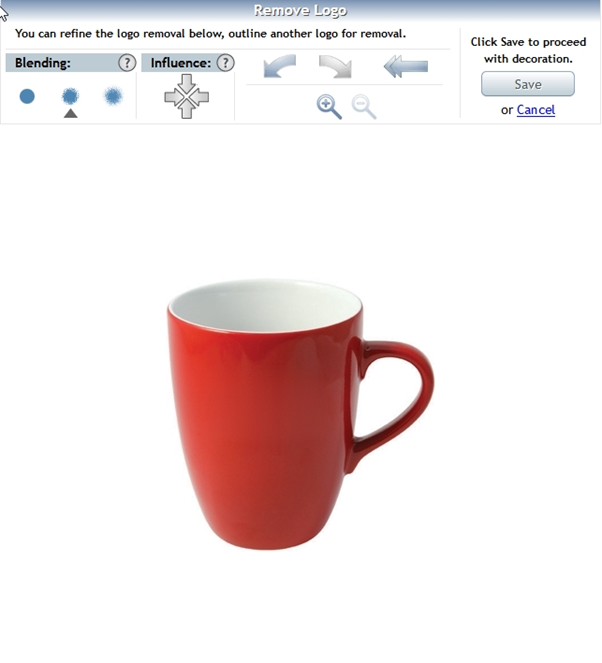
Once you’re happy that all logos have been removed, click ‘Save’ to continue to the decoration tool.
STEP 11
The decoration tool is where you can designate an imprint area for your product. This is the area where the logo will appear when customers sample your product and add their own logos.

When you first click ‘add imprint area’ a red box will appear that can be resized and reshaped as necessary.
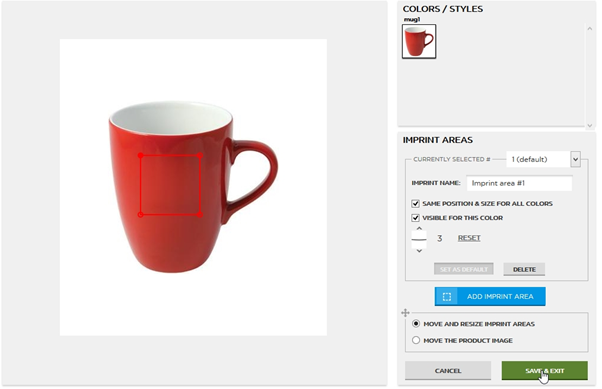
You will notice a couple of options to the right of the screen. With these you can decide whether imprint areas appear on all or individual colours, and whether their layout is consistent with all colours. The value next to the line below these options sets the curvature for your logos. For example, you can use this for any logos on mugs to have the logo curve around the cup when uploaded, rather than displaying two-dimensionally. This gives customers a better idea of how their logo will appear on your product.
When you’re happy with the imprints you’ve added, click ‘Save & Exit’ to return to the product list screen. Your product is now ready for use.
