Customer, Prospect and Supplier Databases
Table of contents
- Customer, Prospect, and Supplier Databases
- Main List
- Adding a new record
- Viewing and amending a record
- Documents
- Diary
- Contacts
- Marketing Tags
- Addresses
- Financial
- Performance
- Potential
- Info Base
- Support Contracts
- Customer Pricing (Customer database)
- Products Supplied (Supplier Database)
- Customer & Prospect Reporting / Exporting
- Controls
- Contents
- Products Of Interest
- Postcodes
- SIC Codes
- Route / Area
- Operatives
Main List
These databases all have the same layout and functions. When you click on either of these buttons you will get a screen which looks like this.

As you can see, there are several tabs along the top of the window. These tabs give you the same information, displayed in the list, depending on the tab you have selected. You can search the database by the tab you are on, i.e. if you are on the telephone tab, you can search by phone number (shown below).
By entering part of the details relevant to each tab in the text button provided and the pressing the tab button on your keyboard, you will be then taken directly to the beginning of records that match the text that you entered.
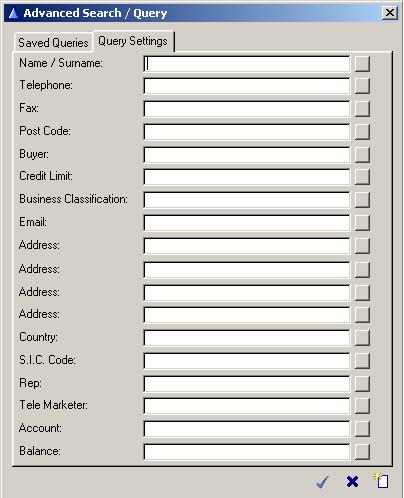
Alternatively, you can use the Query button to search for records. Here you can enter text in any of the fields to find matches or use a wild card search by putting a star in front of the text string, which will search for any occurrence of the string of text you specified.
You also have options of less than, greater than, equal to, etc.
Note : Some users have the option to delete records. When deleting Customers, you have the option to permanently delete them or move them to the Prospects Database. You will also be warned if you attempt to delete a Customer who has Invoices or Sales Orders on the system.
Available options:
| Own entries only | The list can be the complete current database or filtered to only those customers that you are associated with as either a representative or telemarketer. On entry the setting will default to that last selected | |
| Include if ceased trading | The list can be the complete current database or filtered to only include those customers that are recorded as still trading. When checked the legend will be coloured to match the entries of those customers that are recorded as having ceased trading. | |
The list can be the complete current database or filtered to only those customers that you are associated with as either a representative or telemarketer. On entry, the setting will default to the last selected,
including if ceased trading. The list can be the complete current database or filtered to only include those customers that are recorded as still trading. When checked, the legend will be colored to match the entries of those customers that are recorded as having ceased trading.
Contact Tab
When using the Contact display tab, you are searching the contact database, not the customer database. If a contact with the requested last name is found, the associated customer contact is included in the display. The customer will only be included in the display once, even if more than one contact with the requested last name is found.
Note: when searching by Name and the customer is an individual, you are searching by last name.
Adding a new record
You can add a new record by clicking on the Insert button. The following screen will then appear.

If you are adding a record into the Customer database, you have the option to Import an existing Prospect. This is done by clicking on the Import Prospect button and selecting the record you want. The prospect record will now be transferred to your Customer Database allowing you to update as required.
The radio button defaults to Company. If you enter a record for an individual instead of a company, you will need to check the radio button marked individual. The format will change to allow you to enter Title, first name, and last name.
You can then press the Create button to add further information. All the sections within these databases are covered below in the section, 'Viewing and Amending a Record.'
The account number is automatically created.
Viewing and amending a record
Once you have found the entry you need to view, you can go to the entry by; pressing return, double clicking on it, or clicking 'change' at the bottom. The following screen will also be displayed if you create a new record.
The tabs along the top of the screen will vary depending on whether you are viewing customers, prospects, or suppliers.
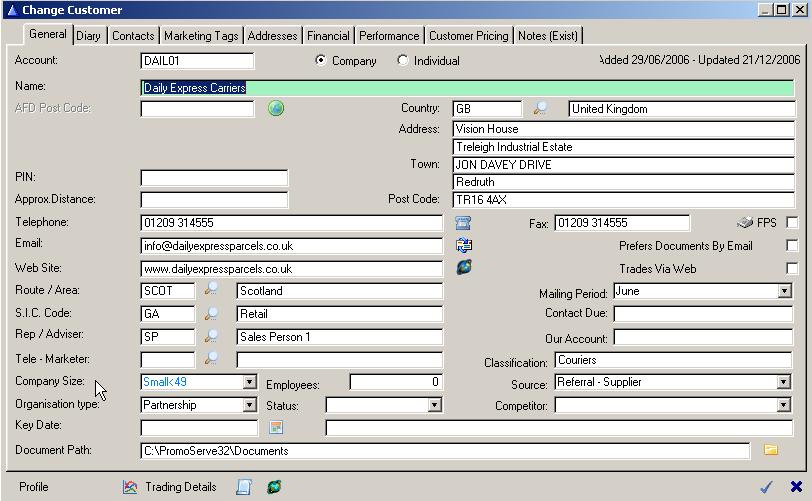
Here you can view or amend any information on the particular customer/prospect/supplier, including their address, telephone number, fax number, email address, etc. as you can see next to the phone number, fax, email, and website, there are little icons.
If you are using the UPS post Code link, entering the postcode in the box under the name will search the USPS database and fill in most of the address for you. All you will need to do is add the Property name or number and verify the details with the contact.
The quick launch option allows you to; click the phone icon to automatically dial a number, click the email button to open a new email message addressed to the recipient, and the website button to be directed to the company's site.
Route/Area is automatically generated from the post code entry, with settings in the 'Post Code' section of the 'System Customize menu.'
SIC codes are the Standard Industry Classification. This can be substituted with your individual coding system if required. This is a mandatory field although a default setting can be used.
Contact due is automatically filled in from the Diary and Scheduler.
Rep/ Adviser : A search field is provided for you to select a representative, adviser or account manager for the customer, which can be used to control reporting and exporting. This Code can also receive a value on change of post code if territories are managed this way.
Telemarketer : A search field is provided for you to select a telemarketer or internal representative, adviser or account manager for the customer, which can be used to control reporting and exporting.
Our Account Number: Use this to record your account number with the customer. This can also be used to store the old MAM account number.
Classification : Use this to record your own Business Classification either as an alternative or supplement to the SIC Code. This can also be used for reporting and exporting.
Company Size : Use the drop down to select the appropriate company size.
Source : Use the drop down to select the appropriate source. This is a mandatory field.
Document Path : Use this field to specify a particular directory where documents relating to the record will be stored. It will be used at the default path by the view documents screen.
Profile : This shows any Profile Questions and answers related to their SIC Code. These questions are customized to your requirements
Trading Details : This brings a screen up which shows you all the Trading History for the record.
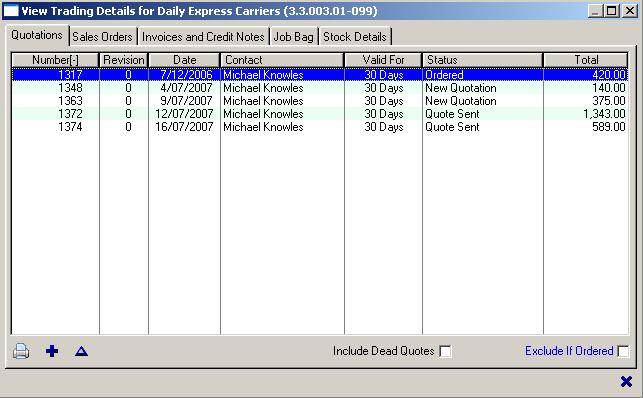
By clicking on the different tabs along the top you are able to view Quotations, Sales Orders, Invoices, Credit Notes, and CRM Operations. You can Enter Quotes, Sales Orders and CRM Operations from this area and view; Invoices and Credit Notes for Customers, Quotes and CRM for Prospects, and Purchase Orders, Invoices, Credit notes, and Payments for Suppliers.
Documents
A list of documents can be maintained against the customer's record. You can also create letters from here by merging fields from the software package into Word.
Documents which have a special meaning include:
Customer / Supplier Specific T&Cs
LOGO use this document as a business form header in place of the standard system header
QuotationTandC1, AcknowledgmentTandC1, InvoiceTandC1, PurchaseOrderTandC1, CustStatementTandC1
If set against a Customer / Supplier, use this in place of the system TandC document. The document in each case must be of type RTF.
For ledger accounts the following logic applies: Use the customer doc (if available), the ledger account doc (if available), or use the system doc.

Along the top of the top screen are more tabs, which contain specific information about that company/individual
Diary
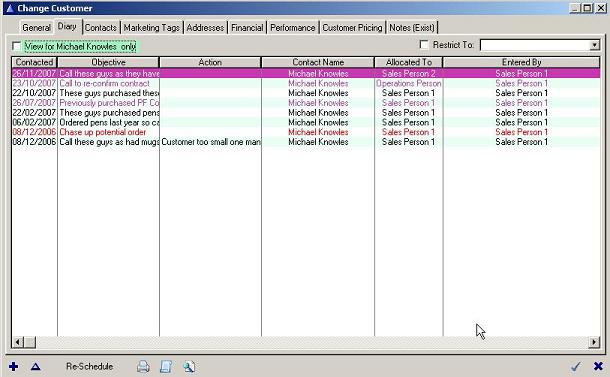
The Diary tab records all schedule entries that are made for this customer, i.e. if somebody inserts a diary entry to contact a company at a certain date, this information is stored here as contact history. It is possible to restrict the entries displayed to the different types of diary entry.
It is possible to add, change or re-schedule Diary entries from here. Please see 'Diary and Scheduler' section for detailed instructions. You can also print the Contact Record which will display contact details, notes, and a list of contacts with objectives and actions.
Contacts
The main contact record shows general company information. Behind each Customer, Prospect, or Supplier, is a contacts database to log employees and their details. When you click on the tab you will get a screen like this:

You can access an individual contact by double clicking on their name, or highlighting the person and clicking on change in the bottom right hand corner. In a new screen, you can create details or amend existing ones.
If you want to add new contacts you would use the Insert button.
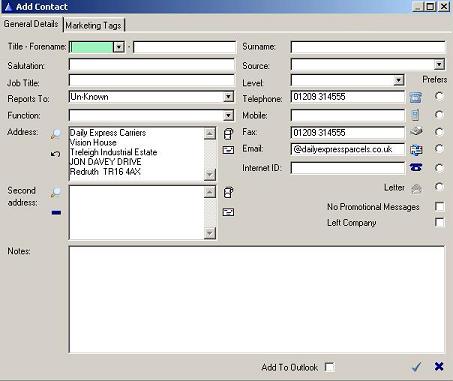
Along the top there are two other tabs, Marketing Tags and Notes.

Here you can add Products of Interest or Marketing Tags of interest, of which you can report on.
You can record additional information in the notes area.
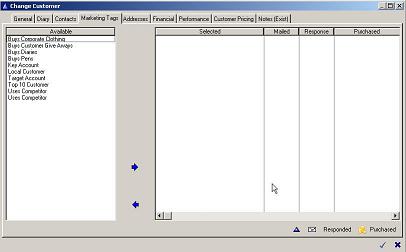
Marketing Tags
You can add particular Products or Marketing Tags of interest, from which you can run reports to be used as a segmentation tool for marketing purposes. These apply to the Customer and Prospects databases, not the Supplier Database.
Addresses
You can enter any necessary addresses, change invoice, statement, and delivery addresses, as well as enter delivery instructions to print on the delivery note. This is useful for marking customers as Cash on Delivery, or other useful instructions for the delivery driver, i.e. Closed for Lunch 1-2, Closed Wednesday afternoon, Use Red Door at end of building, etc. The Addresses tab only appears in the Customer database.

Note : The Invoicing, Statement, and Delivery addresses are useful for single customers whose addresses may differ. If you have multiple branch customers, it may be useful to set up different records for each branch. From there you can use the Ledger account facility to Invoice a head office address, which improves reporting by branch.
Financial
This tab only appears if you are authorized as an accounts user.
The financial tab allows you to enter any financial information you require for your customers. You can enter in their bank details, set ledger accounts and default currencies, etc.
The following screen shows the screen within the Customer database
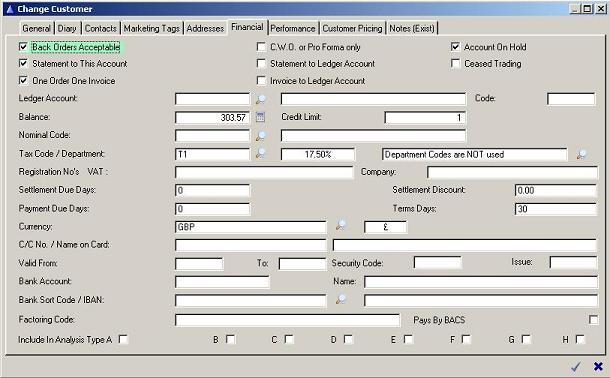
Most of the fields are fairly self explanatory. Check boxes are provided to choose whether the Statement is sent to this account or the Ledger Account address, in the event a ledger account is being used.
The Ledger account is also set up here, which enables you to have a separate record for each branch or division of a company, and send all invoices to a head office address. This enables you to report on each branch individually and have separate pricing if required. The Ledger account invoicing address is selected here.
One Order One Invoice is checked if you want to produce a separate invoice for each Purchase order rather than having the option to invoice a number of different orders together.
The following screen shows the screen within the Supplier database
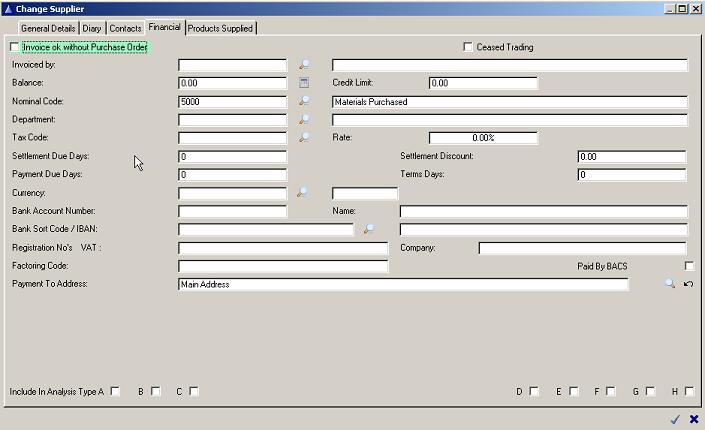
The Prospect database does not have a Financial tab.
Performance
In this section you are able to monitor turnover, as well as set budgets and objectives for individual customers.

Potential
The Prospects database has the following Potential tab as shown below.
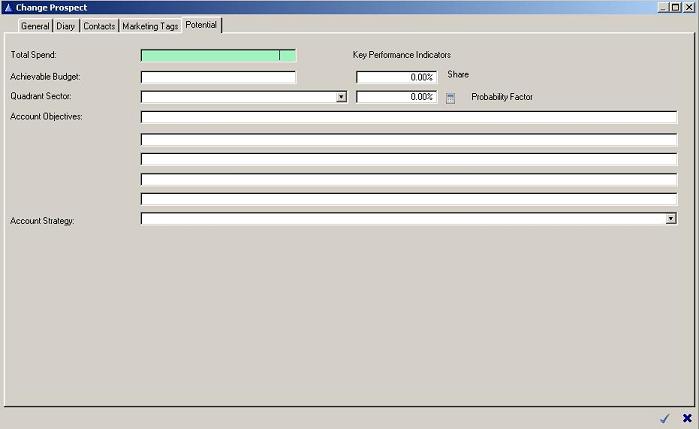
This enables you to set budgets and objectives for prospects
Info Base
Info Base is an additional Database within the record to collect additional information.

Support Contracts
Here you can see if the customer has a current support plan.Use the view button to look at more detail on the chosen highlighted entry.

Customer Pricing (Customer database)
Customer Pricing lets you choose a specific band of prices for a customer, or a global discount off the standard list price. Band Prices and any special prices set up are displayed here. These are set in the Special Prices module, where they cannot be changed. There are options to include Standard Prices for the complete price file, as well as print options.

Products Supplied (Supplier Database)
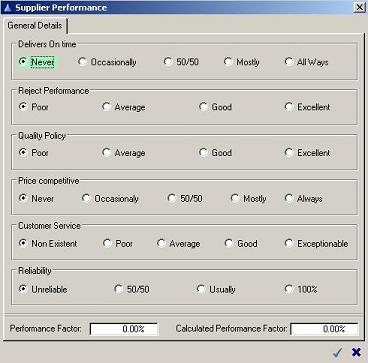
The Performance Calculator allows you to give your supplier a Percentage score. This can be automatically calculated using criteria shown by clicking on the calculator icon at the side.
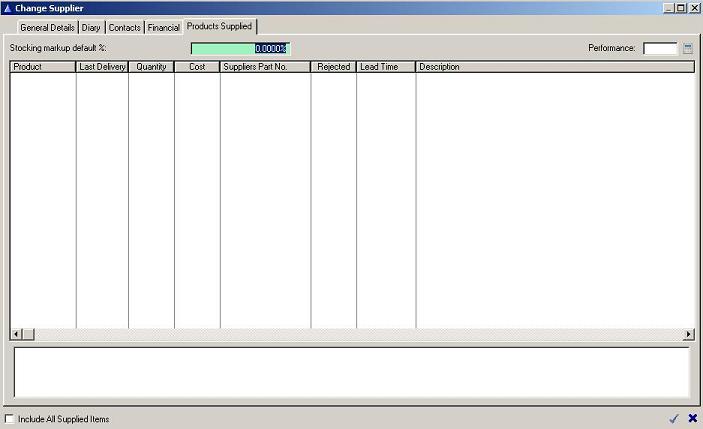
Stock Mark-up is a Standard percentage mark-up that can be applied to a purchase order to cover additional costs. This does not show on the Purchase Order, but will be added to the unit prices of items received when they are booked into stock.
Customer & Prospect Reporting / Exporting
This screen allows you to select a pre-defined report format and previously saved reports from a dropdown box. If you require the report/export in one of these formats, select the appropriate definition, which will set the options for this report/export. When finished, click print to produce the report.Note: Pre-defined formats and previously saved definitions are common to reporting and exporting.
Details entered prior to producing a report/export are used to target certain customers and prospects, meaning if you only include those that have a contact with a job title of 'IT Manager,' it is still the customer or prospect you are reporting on at this level, and NOT the contact.
The main reporting facility is divided into display tabs:-
Controls
Contents
The next are only available if you request them on the 'Control Tab':-
Products Of Interest
Postcodes
SIC (Standard Industrial Classification) Codes
Route / Area
Operatives
Buttons provided are:-
Save: This button allows the current report/export criteria to be saved for future use. You will be asked to enter a name for the report/export. Please know If a report/export exists with the same name, the old report/export will be overwritten.
Additional DB: Click this button to go down to the Additional DB Reporting/Exporting Level. Once selected, the current criteria will be checked and only the accounts that match the current criteria will be passed down to the Additional DB Level.
Contacts: Click this button to go down to the Contacts Reporting/Exporting Level. Once selected, the current criteria will be checked and only accounts that match the current criteria will be passed down to the Contacts Level.
Lead Tracking: Click this button to go down to the Lead Tracking Reporting/Exporting Level. Once selected, the current criteria will be checked and only the accounts that match the current criteria will be passed down to the Lead Tracking Level.
Labels: To print a single label for each entry that matches the current criteria.
Print: This button will start the Report. (Report Mode Only)
Export: Click on this button to proceed with the export of prospect and/or customer details. Based on the controls and content entered, you will be asked which format you want the export saved in. The export format's available are CSV (comma separated values), and XML.
You may enter or browse for and select a file path for the export file. If the type of export selected was E-Shot then you will be switched into the emailer screen. (Export Mode Only)
Controls
This display tab contains the main controls for the reporting/exporting as follows:
Include Prospects: Check this box to include prospects in your report/export. If you are not allowed to report/export on prospects this option will be greyed out (system control setting).
From: Enter or use the ellipsis button to select the prospect with whom you wish the checking for inclusion in the report/export to commence with.
To: Enter or use the ellipsis button to browse for and select the last prospect you wish to check for inclusion in the report/export.
Include Customers: Check box to include customers in your report/export, which activates to and from options. Customer Account No. and Name are printed in bold, to allow prospects and customers to be easily distinguishable. If you are not allowed to report on customers, this option will be greyed out (system control setting).
From: Enter or use the ellipsis button to select the prospect with whom you wish the checking for inclusion in the report/export to commence with.
To: Enter or use the ellipsis button to browse for and select the last prospect you wish to check for inclusion in the report/export.
Include By Products Of Interest: Check this check box to include customers and prospects by Product Of Interest see Product Of Interest display tab below.
Include By Post Codes: Check this check box to include customers and prospects by individual Post Codes, Post Codes associated with a Route / Area or Post Codes associated with Operatives see Post Codes display tab below.
Include By SIC Codes: Check this check box to include customers and prospects by SIC Codes or SIC Code Groups see SIC Codes display tab below.
Include By Route / Area: Check this check box to include customers and prospects by Route / Area see Route / Area display tab below.
Include By Operatives: Check this check box to include customers and prospects by Operatives see Operatives display tab below.
Job Function:Use the drop down list box to select a Job Function, which filters customers/prospects with the selected job function.
Job Level: Use the drop down list box to select a Level, which filters customers/prospects whose associated contact is recorded as having this selected Level.
Contact Source: Use the drop down list box to select a source, which filters customers/prospects whose associated contact is recorded as having this selected Source.
Include If Responded: Use in conjunction with Products Of Interest. If checked, customer/prospects will only be included if they are recorded as having responded to a communication for an included product of interest.
Exclude If responded: Use in conjunction with Products Of Interest. If checked, customers/prospects will be excluded if they are recorded as having responded to a communication for an included product of interest.
Include Those With Recorded Mailing Older Than...:Use in conjunction with Products Of Interest. If checked, customers/prospects will only be included if their last recorded mailing for an included product of interest was prior to the date entered.
Exclude If Purchased: Use in conjunction with Product Of Interest, if checked, customers/prospects will be excluded if they are recorded as having purchased an included product of interest.
Note: this is only available if reporting includes customers.
Only Include Those Normally Mailed In...:To include only customers/prospects recorded as normally mailed in the selected month, click the check box, then use the drop down list box to select a month.
Include Only Company Size...: If you wish to include by company size check the check box then use the drop down list box to select a size. Only customers/prospects recorded as being this size will be included.
Include Only Those Sourced From...: If you wish to include by source check the check box then use the drop down list box to select a source. Only customers/prospects recorded as sourced from the one selected will be included.
Include Only If Suspended: Click this check box if you wish to only include customers/prospects that have had contact suspended.
Include If Contact Suspended: Click this check box if you wish to include customers/prospects, even if they have had contact suspended.
Query 1: Use the drop down list box to select a field whose value is to be checked to see if the entry should be included.
Operand: Use the drop down list box to select an operand, Inc. and Exc. checks the entire field to see if value appears anywhere in the requested field.
Value: Enter the value to be checked for, including, but not limited to; text field, radio buttons, numeric value or a date. Only entries, which evaluate to true will be included.
AND: This by default will be selected, this means that if both query options are specified then both must result in TRUE for the entry to appear on the report.
OR: When selected, this means that if either of the query options results in TRUE, both will be included.
Query 2: Operand and Value: These work exactly as Query 1.
Analysis types A to H: Check the types you wish to include/exclude, which correspond with the customer analysis types on the 'Financial Details' display tab in customer maintenance. The check performed is that only customers that are flagged for the corresponding analysis types will be included/excluded.
Note: This is only available if reporting includes customers.
Include those flagged: Click this button to include only entries for customers that have been flagged for the analysis types above.
Exclude those flagged: Click this button to exclude entries for customers that have been flagged for the analysis types above.
Include All: Click this button to include all customers, this is set by default and signifies that we are ignoring the analysis types.
Contents
This display tab allows the report heading (report mode only) content and sequence to be set. If you click AD Reporting/Exporting, Contact Reporting/Exporting or Lead Tracking button, you can report/export on Additional Data Bases, Contacts, or Lead Tracking. To print labels, only the inclusion of the Buyer and/or Accounts Contact fields have any effect. See Label buttons below.
Report Title:This has a default value but you can change it as required.
Note: Only visible if screen is run in report mode.
Available width: This is for information only. It shows the remaining unused width of the report in one thousands of an inch; it starts at 10,950, the printable width of A4 in landscape.
Note: Only visible if screen is run in report mode.
Print Totals: Click this check box if you wish to print totals for any field that is worthy of a total that is being included in the report.
Note: Only visible if screen is run in report mode.
Available Fields: This contains a list of fields available for reporting or exporting. In report mode, the width required on the report will be shown. Highlight the required fields then click 'Add', which will remove the fields from the 'Available List' and place them in the 'Selected List'.
Selected Fields, Sequence Any field: This will contain the list of fields for inclusion in the report/export, Use the Remove button to move the highlighted entry back to the Available list. The Up and Down buttons can be used to control the printing sequence of the fields on the report/export line. Use the Sort By button to set the highlighted entry to be the sort sequence. This is indicated in the display tab header, where ascending or descending will be indicated by the arrow on the Sort By button.
Buttons provided are:-
Up: Select the field from the 'Selected Fields' and click this button to move the highlighted field up the list.
Down: Select the field from the 'Selected Fields' and click this button to move the highlighted field down the list.
Sort By: Select the field from the 'Selected Fields' and click this button to sort the report on the highlighted field.
Add: Select the fields from the 'Available Fields' (Multi Fields) and click this button to move the highlighted field to the 'Selected Fields', By default the field will go at the bottom of the 'Selected Fields'.
Note: In report mode if the field being added is larger than the remaining space on the report a message will inform you that the highlighted field can not be added.
Remove: Select the field from the 'Selected Fields' and click this button to remove the highlighted field to the 'Available Fields'.
If in report mode the 'Selected Fields' size can be altered by selecting the field you want to change, then double click the left mouse button. A small screen will appear allowing you to specify the new size for the field. (This option is unavailable in export mode)
Note: If the new size is larger then the remaining space the size will revert back to the previous size.
Products Of Interest
This display tab only appears if the Include By Products Of Interest check box is checked, it contains the products of interest available and selected lists plus an override for all or nothing and an 'And Or Include/Exclude' Option.
Available POI's: This contains a list of Products Of Interest available for checking against customers and prospects, highlight the required product then click the Add button. This will remove the field from the Available list and place it in the selected list.
All or Nothing: Checking this check box will include all prospects and or customers regardless of interests.
Selected POI's: This will contain the list of products to be used in the checking use the Remove button to move the highlighted entry back to the Available list.
And: By default this is selected, This means that all the 'Selected POI's' must be True for the entry to be included in the report.
Or: Click this option means that any entry that has one or more of the 'Selected POI's' will be included in the report.
Include / Exclude: Click this option allows you to setup whether the highlighted entry is to included or excluded. This setting is toggled by double clicking the left mouse button. If the POI is set to Include then the record must include this POI, If POI is set to Exclude then the record must exclude this POI.
Buttons provided are:-
Add: Select the POI from the 'Available POI's' and click this button to move the highlighted POI to the 'Selected POIS'.
Remove: Select the POI from the 'Selected POI's' and click this button to move the highlighted POI to the 'Available POIS'.
Postcodes
This display tab only appears if the Include By Post Codes check box is checked, it contains the Post Code Ranges available and selected lists. If your postcodes have been associated with route / areas and or operatives you can add them to the included list on block.
Available Ranges: This contains a list of Post Code Ranges available for checking against customers and prospects. Highlight the required post code then click the Add button. This will remove the field from the Available list and place it in the selected list.
Route / Area:This contains a list of Routes/Areas. Highlight the required route/area then click the Add button. This will remove all the post codes ranges associated with the route / area from the post code available list and place them in the selected list.
Operatives: This contains a list of Operatives highlight the operative then click the Add button. This will remove all the post codes ranges associated with the operative from the postcode available list and place them in the selected list.
Selected Post Code Ranges: This will contain the list of postcodes to be used in the checking use the Remove button to move the highlighted entry back to the Available list.
SIC Codes
This display tab only appears if the Include By SIC Codes check box is checked. It contains the SIC codes available and selected lists. SIC codes are usually grouped so a second SIC Code Group display tab allows you to add them to the selected list on block.
Available SIC Codes: This contains a list of SIC Codes available for checking against customers and prospects. Highlight the required SIC code then click the Add button. This will remove the field from the Available list and place it in the selected list.
Groups: This contains a list of SIC Code Groups. Highlight the required group then click the Add button. This will remove all the SIC codes associated with the group from the SIC Code available list and place them in the selected list.
Selected SIC Codes: This will contain the list of SIC codes to be used in the checking. Use the Remove button to move the highlighted entry back to the Available list.
Route / Area
This display tab only appears if the Include By Route/Area check box is checked. It contains the Route/Area available and selected lists.
Available Rout /Areas: This contains a list of Route/Area Codes available for checking against customers and prospects Highlight the required Route/Area code then click the Add button. This will remove the field from the Available list and place it in the selected list.
Selected Route/Area: This will contain the list of Route/Area codes tused in the checking. Use the emove button to move the highlighted entry back to the Available list.
Operatives
This display tab only appears if the Include By Operative check box is checked, it contains the operative available and selected lists plus the facility to choose the operatives who's customers or prospects will be included in the report/export.
Available Operatives: This contains a list of Operatives available for checking against customers and prospects, highlight the required Operative then click the Add button. This will remove the field from the Available list and place it in the selected list.
Selected Operatives: This will contain the list of Operatives to be used in the checking use the Remove button to move the highlighted entry back to the Available list.
Buttons are provided to :-
Up: This button only appears on the Content display tab. It controls the sequence of printed fields on a line of the report. Click it to swap the highlighted field in the right hand list box with the one immediately above it.
Down: This button only appears on the Content display tab. It controls the sequence of printed fields on a line of the report. Click it to swap the highlighted field in the right hand list box with the one immediately below it.
Sort By: This button only appears on the Content display tab. It allows the sequence of the printed report to be set to the selected field highlighted in the right hand list box. The arrow legend on the button indicates ascending (upward arrow) or descending (downward arrow) order. Click again to toggle.
Add: This button appears on all display tabs other than Controls. It allows the highlighted details from the Available (left hand) list box to be moved into the Selected (right hand) list box, indicating it is a required reporting parameter.
Remove: This button appears on all display tabs other than Controls. It allows the highlighted details from the Selected (right hand) list box to be moved into the Available (left hand) list box, indicating it is no longer required as a reporting parameter.
Additional Data Base Reporting: This button takes you into the additional database reporting facility. There will be a short delay, during which the database is analyzed and a list of customers and prospects is generated for inclusion in the reporting, based on the criteria entered above. Once in the reporting screen, you will be able to target further, based on date ranges and additional database content, where you can select the report content.
Contact Reporting: This button takes you into the contact reporting facility. There will be a short delay, during which the database is analyzed and a list of customers and prospects is generated for inclusion in the reporting, based on the criteria entered above. Once in the reporting screen, you will be able to target further, based on contact database content, where you can select the report content.
Labels: Click this button to print labels base on the criteria selected. Contact name (Buyers or Accounts) will be printed on the label only if included in the contents list. If both are included, the top field with show. There will be a short delay, during which the database is analyzed and a list of customers and prospects is generated for label printing.
Lead Tracking: This button takes you into the lead tracking reporting facilityThere will be a short delay, during which the database is analyzed and a list of customers and prospects is generated for inclusion in the reporting, based on the criteria entered above. Once in the reporting screen, you will be able to target further, based on date range and marketing schedule database content, where you can select the report content.
Print: When selections have been entered, click on this button to proceed. If a print is to be produced, you will automatically be switched to the printer selection screen.
Cancel: This is a standard cancel button and will return you to the previous screen. Any selections entered will be lost.
