Job Management Center Sales and Purchases Processing User Guide
Table of contents
Introduction
The following document details how the Job Management Center can be used to control Sales and Purchase Order Processing within your PromoServe Software.
Through years of experience we strongly recommend that the procedures and examples explained below are reviewed for the following reasons:
1) To initially give you an insight into how the PromoServe Software works in terms of Sales & Purchase Order processing and more importantly
2) Allow you to consider how your own business processes can be applied and controlled through the Job Management Center, ultimately, how PromoServe will be used to benefit your business.
3) Help reduce Resistance to Change as the prescribed process provides a structured approach in beginning to use the software.
We advocate this approach simply because the Job Management Center provides a means to centralize both Sales and Purchase Ordering through what is known as a Job Bag. Our studies have uncovered that this approach dramatically improves user confidence and understanding, helping to overcome the introduction of a new Business Management System.
Job Management Center
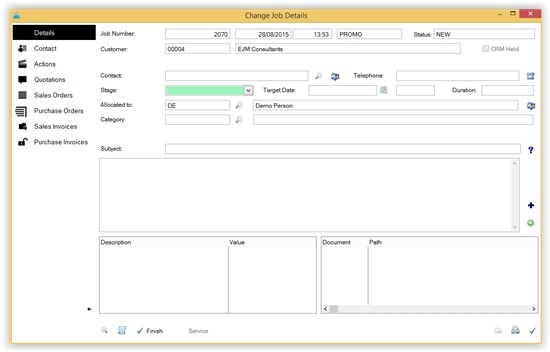
CRM Job Management Center is designed for use as a task management system. When you first go into the Job Management Center you will get a screen like this:

The tabs are as follows:
Account only This lists all the open calls for the customer/prospect which is highlighted at the time. You can also select different companies, by clicking on customer prospect.
Date Enables you to search for calls placed on a certain date
Allocated to This shows all the calls allocated to a particular operative. It defaults to the operative logged in at the time, but you select a different operative by clicking on the operative tab in the top left hand corner
Status Lets you see if the calls are allocated or closed. N.B to see closed calls put the check in the box in the top right corner; a unallocated call will show as a status of new and so will not be listed in any operatives list.
Stage This lists which calls have a higher priority than others
Category Lists the calls in category view
Actions for...This lists any outstanding actions relating to the operative on the allocated to tab.
Inserting a New CRM
To insert a new call click on insert in the bottom right hand corner. You will then get a box asking for you to select the customer or prospect:

You can select if it is either a customer or prospect by placing a dot in the particular box. You can search for your company, by either typing in their account number, company name, support no and support reference. If you are not sure of these then you can click on the ellipse button and search for the company from the database. Once you have selected your company click on create.
The tabs along the top are as follows:
Details This lists any support contract details of the customer
Contact Shows the contact information for the contact selected
Action This box allows you to log all the actions that you have done
Quotations Here you can see if a call has a quote attached to the CRM; you can also insert a quote from here by clicking on insert and following the procedure for adding a quote.
Sales Orders Here you can see if a call has a sales order attached to the CRM; you can also insert a sales order from here by clicking on insert and following the procedure for adding a order.
Purchase Order Here you can see if a call has a purchase order attached to the CRM.
When you are setting a CRM call there are several boxes you need to make sure are filled in correctly.
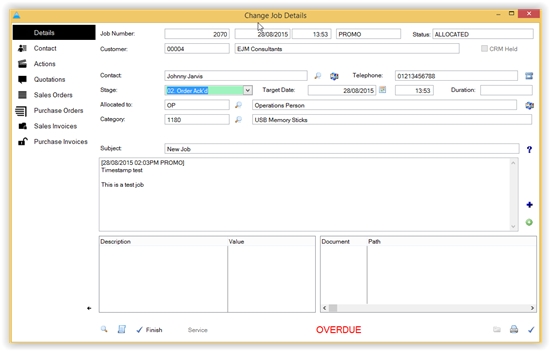
Here you can check that you have the correct account and if there is current support contract set up for this customer. Then the stage and target date boxes will be filled in so you see what kind of support the customer has. The contact box allows you to select a particular person who works for the company, and the product box allows you to choose if a product is associated with the CRM call.
The allocated to box allows you to allocate the call to a certain member of staff, who can choose from the list by clicking on the ellipse button. The stage level enables you to assign a certain level of priority to the call; these can be edited in code & phrases. The category box allows you to select what type of call it is; the target date is automatically decided by the priority but this can changed by clicking on the ellipse button. The subject box is where you can type in the subject of the call, and then put the main body of the notes in the box below.
If at any stage you need to look at the customer's record, you can click on View Customer at the bottom. Once you have finished with the call then you can click on Finish; it will ask you if you are sure, then it will take it out of the list.
There are also other buttons at the bottom:

Print This will print the CRM call highlighted at the time
Solve This box allows you to solve the call from the front screen
Cancel If the call has been open by mistake then by clicking on this you can cancel it
Reopen If you have a closed call, you can reopen it by clicking on this button
Follow up By clicking on this you can add a scheduled entry for a follow up call
Reporting/exporting
This function allows you to do extensive reports and export CRM:

Here is a break down of this page:
Include Operatives By ticking this box you can select several different operatives at once
Include Closed/Cancelled Will also include calls which have been closed
Print Criteria This will print off the criteria on the report
Print totals This will print off the totals at the end of the report
By putting a check in any of the boxes below also you to report on CRM calls for a customer, prospect or product.

You also have have the normal query boxes, which allow you to further filter the report:

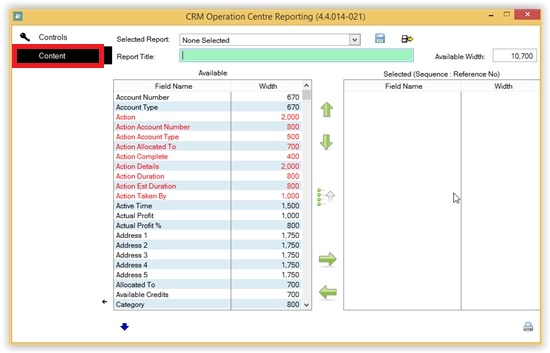
The contents tab at the top allows you to select what information is displayed:
Purchase Invoices
This routine allows you to enter in invoices and credit notes from suppliers onto the system, when you go into purchase invoices you will get a screen like this:

There are several different ways of displaying the information the first tab shows the invoices in date entered order, document allows you to search for a particular reference number you have attached to the invoice and payee allows you to search for a supplier and it will then display all the invoices displayed for them.
To insert a new invoice onto focus click on new invoice, you will then get this screen:
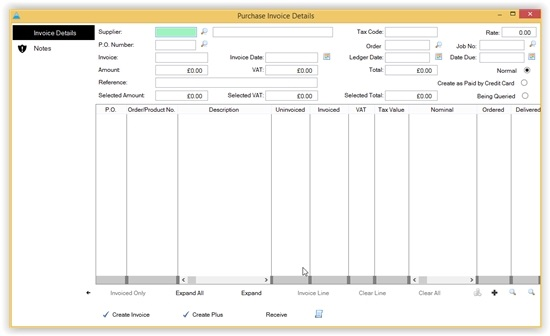
At the top there is a supplier box if you know their account code then type it in alternatively click on the radio button and you can then select the supplier from the database.
Once you have selected the supplier it will then list all the purchase order on focus which you have raised to them, once you have found the order which relates to the invoice you can either double click on the line or highlight it and click on invoice line at the bottom, it will then automatically enter in the invoiced column the amount of the invoice, if the invoice is for only part of the order, then highlight the order and click on expand at the bottom which will then show you all the products on the order so you can invoice just for what you have received.
Once you have entered on all orders which have been invoiced your screen should look something like this:

As you can see several different order have been invoiced, the total figure is displayed in the selected amount box, to make sure you are happy with this amount you then have to then enter the same amount in this box then enter in the date on the invoice and click on create invoice at the bottom and it will then add it to the list with the others.
If for some reason the invoice from the supplier is not the same as the order you placed, i.e. you have received an item free of charge, or you have only received half the order, then highlight the order click on expand, then double click in the invoiced column and you can enter in a different amount to what it shows. If you will not be receiving another invoice from the supplier, double click on the fully invoiced column to change the no to yes, then go through and fill in the value boxes as normal.
Creating a Quantity Product
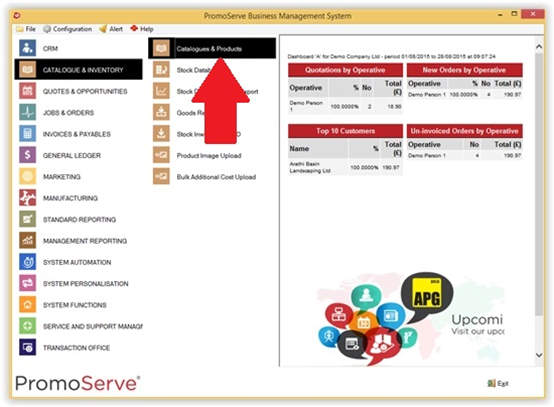
In order to create a new Quantity Product from the main PromoServe menu click on the Catalogs & Products button as shown below:
On selection, the Catalog/Product Database will then be displayed as shown below:

In order to add a new Quantity product to the Database click on the Blue Plus button as circled above. The following screen will then be displayed:
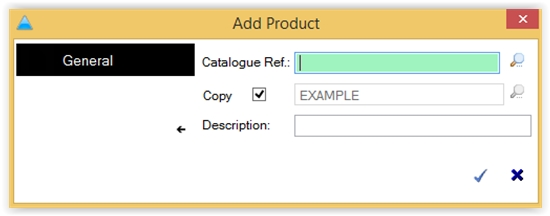
Catalog Ref: - enter a unique product code. In this example a test product will be created as shown below:
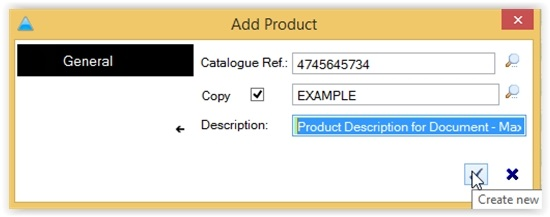
Click on the Create button. The record card will now appear requiring details to be entered for the product in Question. Within the Details Tab enter the relevant product descriptions etc.

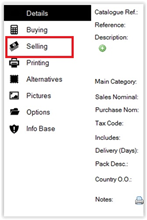
IMPORTANT The next step is to click on the Selling Tab and enter the Quantities & Selling Prices applicable to the product.
Enter the Quantities and Selling prices in the available text boxs as shown below:
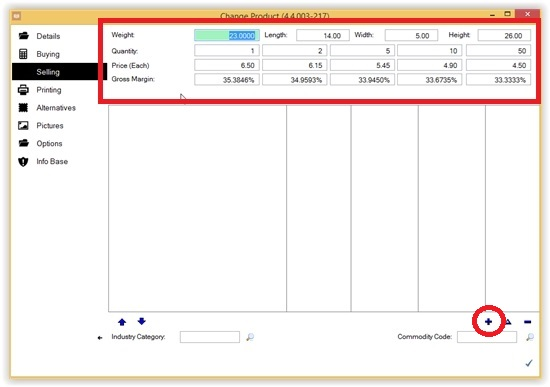
The next step is to assign Additional Costs (if relevant to the Product). Click on the Blue Plus button as circled above. The following screen will then be displayed:

Click on the magnifying glass to the right of Cost Code. The Additional Costs database will then be displayed as shown below:
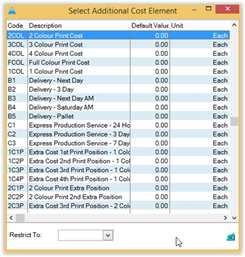
In this example an Origination Charge will be added to the Product. Highlight ORIG (Origination Charge) followed by clicking on the Select Button.

Check the One Off checkbox and enter both Buying and Selling Costs in the applicable textboxes available.
Note: Cost entry boxes reflect the Buying costs, the prices the Supplier will charge you. Price, refers to the Selling prices that you will charge the Customer. Enter Cost Prices of $15 and Selling Prices of $25. You screen should be similar to the below:

To confirm the additional cost price entries click on the Ok button. The additional costs for Origination will then be assigned against the new product entry. Repeat the process if you wish to assign further additional costs against the Product.
The next step is to enter a Preferred Supplier (the supplier you would commonly use to order products of this type from) and the Buying Prices. In order to do so, click on the Buying tab as circled below:
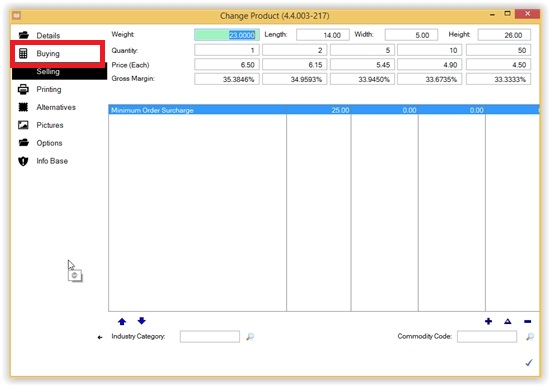
To enter a "Preferred Supplier" click on the magnifying glass to the right of "Preferred Supplier". On selection the Supplier Database will then appear. Highlight the applicable Supplier and click on the "Select" button. The Supplier will then be assigned against the product.
Enter the Buying Prices in the relevant textboxes.
To create the new Product click on the Ok button. The product now be added to the Catalog/Product Database as shown below:
Note: The remaining Tabs within the Product record card allow further additional information to be added against the Product
Purchasing and Goods In Procedure
The purchase ledger controls all aspects of the purchasing side
Purchase orders
In purchase orders you can insert purchase order for your suppliers, the first screen you have is this one:
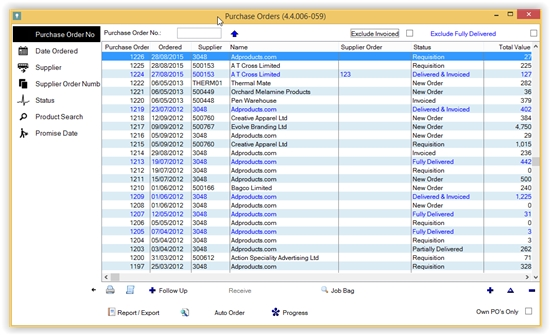
At the top you can search by various different methods,
Purchase order no This lists the purchase orders in numerical order and you can search by purchase order number
Date ordered this tab lists all the purchase orders in date order format and you can search by date ordered
Supplier By clicking on this tab you can choose a supplier and it will list all the PO’s you have for them
Supplier order number If you click on this tab you search by your suppliers order number
Status Lets you search by status, i.e new order, invoiced etc
Product search Lets you type in a product, and it will list all PO's with that product on
Inserting a purchase order
To insert a Purchase order, click on insert in the bottom right hand corner, you will then get a screen like this:
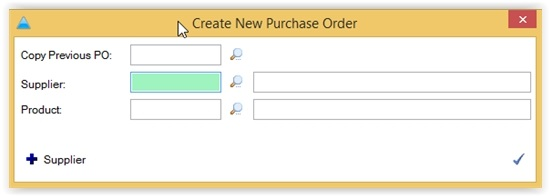
From this screen you can choose to copy a previous PO by clicking on the magnifying glass button, you can select the supplier by clicking on magnifying glass and choosing from the list, or or you can choose a product and choose the supplier afterwards, you can also add a supplier from here as well. Once you have done this click on create.
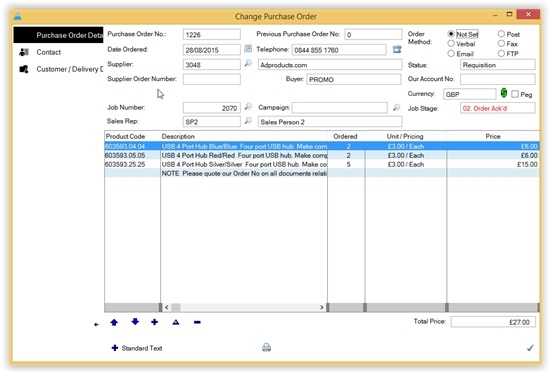
On a purchase order you have three tabs along the top, the first one contains all the details of the purchase order, the contact tab enables you to select a contact from the supplier, the delivery details tab, allows you to choose different delivery addresses also you can choose a customer on the purchase order, so you can see who the order is for.

Purchase order no This is the purchase order number which is automatically generated by the system
Previous purchase order no This is filled in if the purchase order has been copied from a previous order
Date Ordered The date the order was placed
Status This is the status of the purchase order, requisition means it has been entered on the system but not sent to the supplier, new order means it has been sent, fully delivered & invoiced, means that you have received the goods and have been invoiced.
Supplier The supplier who you are receiving the goods off
Order method How the order has been sent

Supplier order number If your supplier has a order number you can enter it here
Buyer The user who has raised the purchase order
Our account no This is your account number with the supplier, and is set up in the supplier details
Project ID If the purchase order is part of a project then by selecting the project here will update the project database
CRM reference By typing in the CRM reference number here you can link the PO to the CRM call, and it will appear on the call in the CRM center.
Currency This is the currency of the purchase order
Adding a product to a purchase order
Once these are set up then you can add products to the purchase order, you can do this by clicking on insert at the bottom and you will get this box appear

You can type in the product code and it will find the product.
Products supplied If you have set up suppliers who supply certain products then they will appear in the products supplied button. This will also look through previous purchase orders and list products that the supplier has supplied before.
All Products This will show you all the product database
The buying and pricing units come from that product, but these can changed if you wish you can then enter in quantities and prices, there is also a text box at the bottom for you to type in extra information about the product
View Product This will open up the product database on that product.
Add Alt Desc. This will add any alternative description you have in your product database
Add Std. Text This will add any standard text that the administrator has set in Codes and Phrases
OK This will add the product displayed to the order
Once you have entered all the products, there are some extra buttons at the bottom on the screen:
Up/Down These move buttons up and down on the purchase order
Additional costs By clicking on this button you can add any additional costs to the purchase orders, these can be set up in system customize
Insert Allows you insert more products onto the purchase order
Change Allows you to change a product on the purchase order
Delete By highlighting a product and clicking on this button will remove it from the order
Add standard text By clicking on this box you can add pre defined text to the order, these can be defined in codes & phrases
OK This will complete the Purchase order
Once you have entered all your products onto the order, click ok and it will add it to the list with a status of requisition. Requisition means the order has been entered on the system but has not been sent to the supplier, you can change the status by highlighting the order and clicking on print, you will then get this screen:
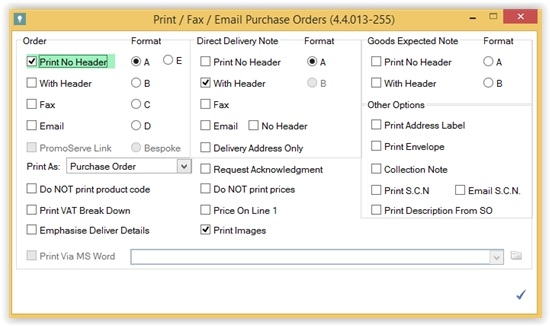
As you can see you have various options on how you want to send the purchase order, from here you can also print off goods received notes and address labels.
You also have the option to print Direct Delivery notes where the supplier sends an order direct to your customer.
You can also change the status by clicking on the order status radio button in the actual Purchase Order. This is useful for verbal orders.
Once you have received stock in through the receipts routine then the status will change to fully delivered, and once you have entered the invoice from the supplier it will change to fully received and invoiced.
Other buttons are available
Documents This allows you to view or add documents to the supplier record or purchase order
Add Follow Up This allows you to schedule a call to the supplier
Report / Export This section provides comprehensive reporting on purchase orders. You can set reports to print or be exported as a csv file.
Query This allows you to filter the list to find specific criteria.
Auto Order This is a useful facility to search through stock required for purchase orders and stock below the minimum set levels and generate purchase orders.

This routine looks through all the orders on the system and works out how much you need to order off your suppliers to meet these orders, you have two options at the bottom the order required button will produce purchase orders for you to fullfil your current orders. The order replenish qty will look at the replenish qty field on the product in the product database, if the physical stock is less than the reorder level amount then it will a create a purchase order which will take the amount from the reorder qty field on the product page. It will choose the supplier by looking to see who you brought it off last time.
You have the option to highlight the record and either change the supplier by clicking on the triangle icon in the bottom right hand corner or remove the item with the minus icon.
Purchase Order requisitions will be generated for the required stock. These can then be printed or reviewed and amended as required.
Receipts
This where you receive your goods in from the supplier, you will have a screen like the one below and you can search for your order, by either purchase order number, the supplier who you brought it off, the suppliers order number to you, or by searching for a product which appears on the order:

Once you have found your order, highlight it and click on select in the bottom right hand corner,
You will then get a box like the one shown obelow, you can see each product on the order, to receive the product into stock highlight the product line and click on receive, this will then enter the qty amount in the delivered column so you can part receive orders, or if you are receiving all the qty at once then click on receive all will automatically put all items into stock.
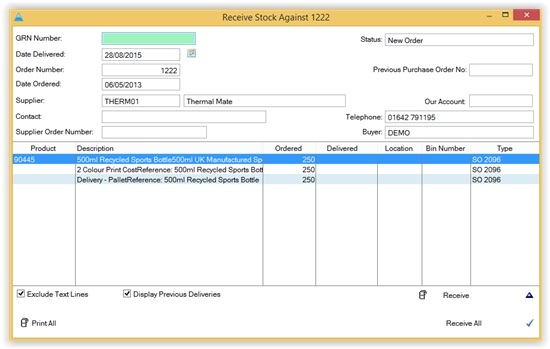
The GRN number is auto generated when you have completed any changes and click on the OK button
If you want to receive the stock into a different location then highlight the product and click on change this will give you this screen:

From here you can select locations and give it a bin number, If you are receiving more than one of a item you will then get a extra tab at the top which will allow you enter in individual serial or batch numbers for each unit, this is useful if you need to keep a track of individual product units.
If you need to un-receive stock from a supplier then you do it from this page as well, first of all highlight the purchase order, click on select it will then list the deliveries and the date it was delivered, highlight the date line and click on change you will get a screen like this:

You can then select a transaction for the return of goods, and then enter a quantity in, when you click on ok, you will get a screen like this asking you why you have rejected the goods:

This comment will then get recorded against the product in the transaction database, so you can any reason for not having enough stock.
Inserting a Purchase Credit
To enter a credit note from a supplier onto the system, click on new credit note at the bottom:
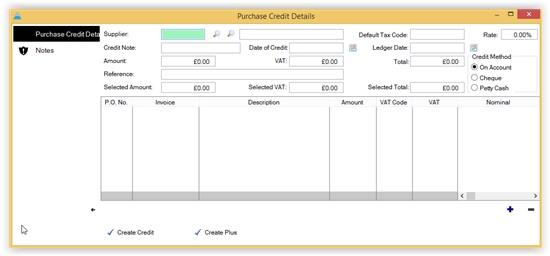
You then need to select the Supplier account number. The following screen will appear:
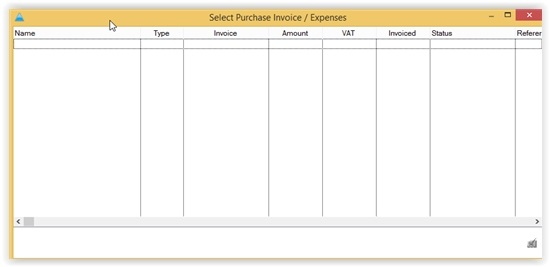
You will need to highlight the invoice number the credit is against.You can then double click in the invoiced column and enter the amount of the credit note. You can also double click in the description field to put a reference number in, once you have done this then enter in the amount in the amount field and click on create credit.
Buttons are provided to:
Report/Export Comprehensive reporting can be made to display/print or export to a csv file.
Query The Query function can be used to filter the list of invoices shown.
Setting up CRM Auto Actions
To create an auto action you need to select System Personalisation from the main menu and then select the Categories Button:

Once you select the Categories button you should be prompted with a box like below:

Next select the insert button and you should be prompted with a box like below:

Make sure to select the CRM operation, enter your details in the details field and your category in the category field.Then tick out of the box and select the CRM details button at the bottom of the screen which should bring up the box below:

Then select the Insert button which should bring up the following screen:

Insert your action details and the notes to go with the action in the relevant fields.When complete select the OK button.
You have now set up your auto action. To make sure this has completed successfully open up Job Management Centre and insert a CRM. When you select Category (in the example Support), you should be prompted with a box like the one below:
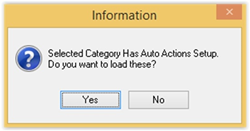
Select yes to this box and select the actions tab in the CRM centre. See box below:

The auto action has been created.
CRM Job Management Centre 'Theory Test'
1) Create a Job Bag for a Customer
2) Create a Job Bag for a Supplier
3) Create a Job Bag for a Prospect
4) Add a new Customer to the Customer Database
5) Add a new Supplier to the Supplier Database
6) Create a Job Bag for a Customer and Add a Quotation
7) Create a Job Bag for a Customer, add a Quotation & then convert the Quotation to a Sales Order
8) Create a Job Bag for a Customer, add a Quotation for one product, then convert the Quotation to a Sales Order and raise a Purchase Order off the back of the Sales Order
9) Create a Job Bag for a Customer raise a Quotation and add 2 products to the Order. Convert to a Sales Order and then ensure 2 separate Purchase Orders raised from the Sales Order. One Order for the first product and its additional costs, the second for the 2nd Product and its Additional Costs
10) Create a Job Bag for a Customer raise a Quotation and add 1 Product. Ensure that additional costs are added also. Convert the Quotation to a Sales Order and then raise 2 Purchase Orders the first purchase order for one Supplier for the main product, the second purchase order for the additional costs. Ensure that the Supplier of the main product is delivering do the 2nd Supplier who will be dealing with the additional costs. Ensure that the 2nd Supplier is delivering directly to the Customer.
11) Add a new Quantity product into the Catalogue database
12) Convert a Prospect to a Customer.
