Goods Received Routine
Enterprise features a Goods Received function, as a simplified way of updating your system with any goods that have been delivered to yourselves ready for distribution. This help sheet will run through a standard Receive routine with the aim of helping you to better understand this functionality.
STEP 1
From the main menu of Enterprise, navigate to Jobs & Orders > Receive Goods

STEP 2
On the Receive Goods screen you will see a list of recent Purchase Orders that are yet to be fully completed. By default, fully delivered orders are omitted. However, you can change this by unchecking the ‘Exclude Fully Delivered’ checkbox at the top of the screen.
To mark goods as received, locate the purchase order you wish to mark the goods against and click the green tick in the bottom-right of the window.

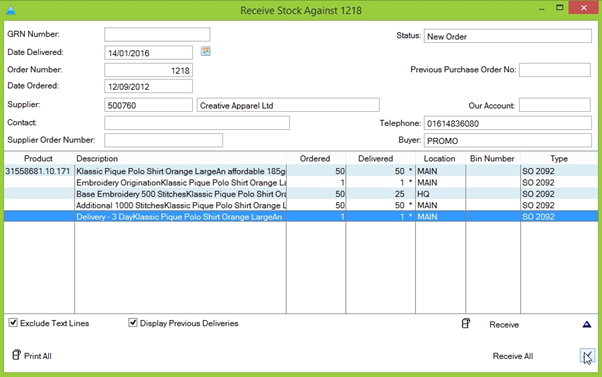
STEP 3
The ‘Receive Stock Against #’ screen is displayed. You will notice that each line of the order is listed and can be amended individually.

STEP 4
If you have received all the goods relating to a certain line, you can receive these simply by highlighting the related line in the order and clicking the ‘Receive’ button below the table. This will autocomplete the Delivered and Location fields with the expected amount and default delivery location respectively.

If you need to make partial changes/set a different location, move to step 5. If not, repeat this process for the other lines (or if relevant, use the ‘receive all’ button to auto-fill all lines with full delivery and default location) and move to step 6.
STEP 5
To partially receive an item, highlight the desired line and either double-click on the line itself or click the blue triangle in the bottom-right of the screen. This will produce the ‘Change Receipt’ window

On this screen, you can enter a manual amount to receive by entering it in the ‘Delivered’ field. You can also use the ‘Fully Delivered’ checkbox to auto-receive all expected goods if you only wish to set a different delivery location. This is done by amending the ‘Location’ field at the bottom of the window. If you know the code for each location, you can enter this manually in the leftmost box. If you do not, you can click the magnifying glass to display a list of all listed delivery locations to select from.

Once you’re happy with the information entered, click the blue tick in the bottom-right to return to the ‘Received Against #’ screen.
STEP 6
Review your changes. Once these are confirmed in the system and the order is fully completed, they cannot be reversed.
Once you’re happy, you can print labels for the received goods if necessary by either using the ‘print all’ button in the bottom-left, or the label icon next to ‘Receive’ to print the highlighted line.
Once you’ve carried out all necessary functions on the screen, save your changes by clicking the blue tick in the bottom-right.
STEP 7
After confirming your changes the ‘Reason for Transaction’ screen will be displayed. A number of pre-defined options are available. You can also manually enter a reason in the green text box at the bottom of the window.

Once you’ve selected/entered a reason, click the blue tick in the bottom-right.
With this, the goods have been successfully received and this is now reflected in the system.
