Setting Up Your Logos in Enterprise
The following help sheet will explain how to add your logos to your Enterprise system, so these are displayed on documents generated.
PLEASE NOTE:-
- When initially configuring your logos, this should be done on the server machine. Provided the logos are correctly configured on the server build, these will be automatically copied over to any client systems installed as part of the same system.
- Setting logos of the correct size is essential. If a logo of a different size is uploaded there is a high probability this will appear distorted/skewed on documents. Exact size references can be found later in this help sheet.
- When you need to update your system logos, you only need to adjust/replace the logo installed on the PromoServe server machine. Once complete, the 'Re-Install from server' option can be used on the clients to update their logos with the current version on the server.
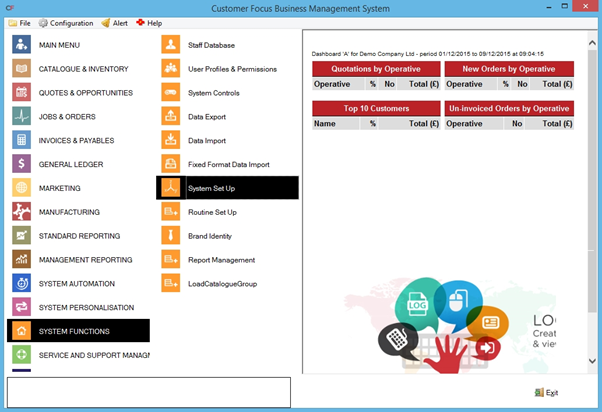
STEP 1
From the main menu, select ‘System Functions’ followed by ‘System Set-Up’.
STEP 2
The System Set Up window will open, with the ‘logos’ tab open by default.
This screen is set into two sections. The top half is for the logo that will be displayed when printing documents. You have three options:
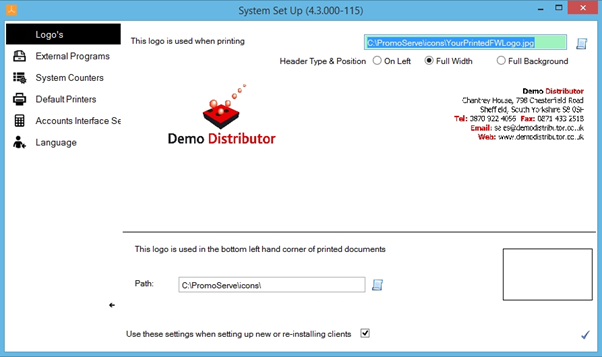
Option 1 - Full Width (recommended). The logo will be displayed across the full width of documents & must incorporate all company details you wish to be displayed. The image size for a full width logo should be set to a width of 2288 pixels and a height of 285 pixels. An image resolution of 96 dpi is recommended. Click HERE to download an example full width logo.
Option 2 - On Left. The logo will be displayed on the top left hand side of documents. Your Company Name, Address, Tel, Fax, Email & Website will be printed automatically top right, the settings being taken from the 'Company Details' section of PromoServe. The image size for an On Left logo should be set to a width of 365 pixels and a height of 119 pixels. An image resolution of 96 dpi is recommended. Click HERE to download an example On Left logo.
Option 3 – Full Background. The logo will be displayed as a background, and will be stretched to fit an entire page of A4. It is generally not recommended to use your company logo for this, as it can make text on the document very difficult to read. This option is intended more for patterns and other background-like designs. You will generally need the On-Left or Full Width option.
The logo at the bottom of the system setup screen appears on the bottom left of a majority of documents. This is generally used to show affiliations to other organisations such as the BPMA. The image size should be set to a width of 144 pixels and a height of 77 pixels. An image resolution of 96 dpi is recommended. Click HERE to download an example affiliations logo.
STEP 3
At the bottom of the logo setup screen, you will notice a radio button labelled ‘Use these settings when setting up new or re-installing clients’. Ensure this is ticked before continuing, as it will notify the system to send these logos through to any connected client systems.

STEP 4
When you are happy with the logos you have configured, click the blue tick at the bottom right of the system set up screen. This will save your new logos in the system.
TIP: If for whatever reason you variate between an on-left and full width logo, define both file paths when setting up your logos, then click the radio button for the layout you wish to use initially moving forward before you save & close. This will allow you to quickly switch between the two if required at any point.
