How to Enter Products onto the Envoy 2019/20 Catalogue
Using the Product Entry Portal (PEP)
If you have ever used PEP to enter a product onto the Web Only catalogue, or either previous Envoy or Spectrum catalogues then you do not need to add in a new product from scratch, you will just need to copy over the products you want in the new catalogue, from the previous ones.
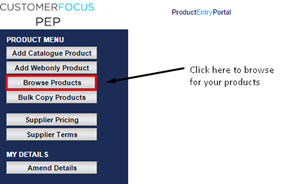
To do this, you must be logged into PEP and click in “Browse Products”. From there, find the product you want to duplicate by either searching for it using your reference you use for it, or by searching through the catalogue it is placed in.
Once you have found your product, click on the name and this should take you to the main info page. From here, if you find a drop box menu near the top of the product data that is labelled “Add product to catalogue”, clicking on this will bring down several catalogues that you can duplicate the product to, the one you’ll want being “Envoy 19/20Z”.
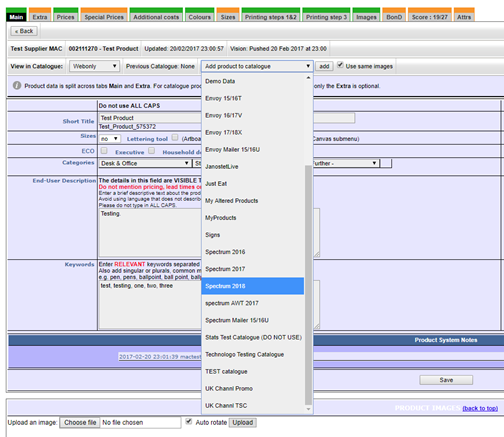
Select this, and if you will be using the same images as previously, then keep “Use same images” ticked, else if using new images, untick this and click on the add button beside it.
This should add your product to the Envoy 19/20Z catalogue and you can make any new changes to this from here, remember that if you make any new changes make sure you hit “Save” on that page.* Pricing methods have changed in recent years, please pay special attention to step 5 below before moving on to the next product.
Entering Products for the First Time
This is a guide on how to add in products into the Envoy catalogue, if you are using the Product Entry Portal for the first time:
- First, you will need to visit the website https://uk.customerfocus.com/pep and log in using your email address and password you set when registering for access to PEP. (If you do not know your password, you can use the “reset your password” option in the login screen. If you have not registered an email address please contact data@customerfocus.com.

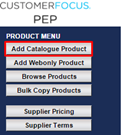
- Once logged in, to add a product into the Spectrum catalogue, you will need to click on “Add Catalogue Products” in the left side menu.
Within the next screen, you will need to add in the title of your product, the category of it from the drop down menu in the “Allocate Category” section and the catalogue in which the product will be added to, which for Envoy this year is “Envoy 19/20Z”
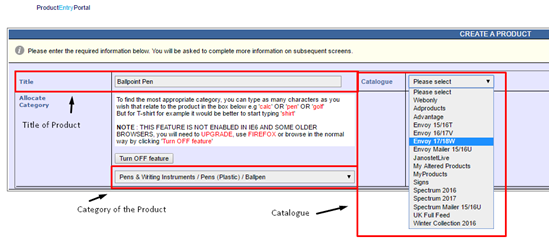
Be mindful that when selecting a category that best suits your product, it will be best to use a sub category so that it is more specific to your product (in the example above, the sub category is “Ballpen”, which is a sub category for “Pens (Plastic)”, which is also a sub for the master category “Pens & Writing Instruments”). If you are struggling with choosing the right category, pick a master one for now, you can always come back to it later. Once you have filled this page in, click on “Create Product Record”.
- The next screen is the main information for the product, but you will also notice an array of red and amber colours assembling different tabs for your product:

This “traffic light” system is to show you that any tabs that are displayed as red require additional information to be added in, to turn it to green. For your product to be uploaded onto our sites, this needs to be showing both green and amber tabs.
In the MAIN tab, here you can edit the title of your product, in case you want to change it, and you can add in your supplier reference, the one you use from your database.

If your product is a clothing item, and it has different sizes, you will need to select “yes” in the size drop down menu, and tick the “Clothing” tickbox, which both will enable the SIZES tab to be edited.
You can also edit your product’s category from here, but please make sure you are choosing a sub-category for it when possible. To the right of the categories is the lead time, you must enter in your maximum lead time for this, if you do have any other services you do (24-hour, express delivery etc.), you can enter those in the EXTRA tab.

The Extra Information will appear as a light grey text on Search and is mostly used for auxiliary information such as “best-selling item”, “Origination is FOC” etc. It is NOT seen by the customers on store sites, this information is only viewable by distributors in Search.

Keywords is straight forward, you will want to use words that will be searched by end users to find your product, the more keywords you have, the more likely your product will be found in a search. Also you will want to use words that describe your product and not just words from your title, so for instance if your product is a metal pen, you may want to use keywords like “writing, stationery, metal”.

Once all fields in the MAIN tab have been filled in, click on “Save” towards the bottom of the page and we can move on to the next page.
*Please take note that any special characters that are used in the title or end-user description (i.e. ®, ™ or superscript ) will not be accepted by our system and must be removed*
- In the EXTRA tab, you should be greeted with this window:
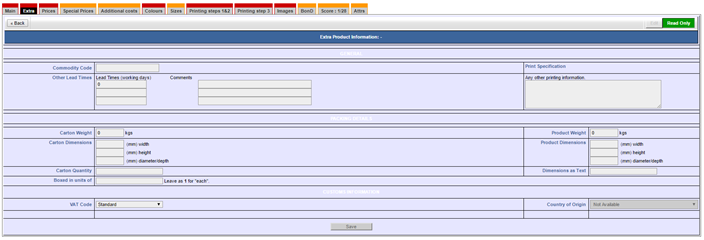
Within this section, you can add up to 4 points on your score, so it would be beneficial to fill in as much as you can here. The score is what we use to rank products in Search, so when customers search for products, the higher the score, the sooner you appear within the search list so we do ask all suppliers to add in as much data as they can to gain a high score (What you need to get for a high score will be explained later).
The commodity code is the number assigned to the product if it is being imported or exported outside of the EU and can be found here https://www.gov.uk/trade-tariff.
In the Other Lead Times section, you can add in different lead times from the maximum one needed from the previous page, so if you offer express delivery you can enter that lead time here, and in the comments box next to it, enter in “express delivery service, extra costs apply” or something along those lines.
The Print Specification box is only used for a mass import of products, you will not have to worry about this if adding in your own products.
Carton Weight, Dimensions, Quantity, boxed in units of, Product Weight and Dimensions are used to calculate shipping via a carrier integration, please fill in all details with as much accuracy as you can.
- Now on to the PRICES tab, which should look like this:

Enter your pricing using one column only. DO NOT enter pricing in different columns. This will prevent pricing from displaying correctly on Vision. The prices here should be the standard basic units you offer. So if your product has a Plain Stock price available, enter only those here. If you have more than one print method, please enter your basic pricing in Plain Stock.
If the product is also available with a colour pricing, this should be entered as an Additional Cost, which we shall move on to shortly.
Remember to select the mark above the column which you have entered your pricing.
Click 'Update Price Matrix' to save your prices
- The SPECIAL PRICES tab is very similar to the PRICES tab in how you would use it, but this is exclusively for clothing items, so you can assign different prices to different colours and sizes.
- The next tab is ADDITIONAL COSTS, which should look something like this:
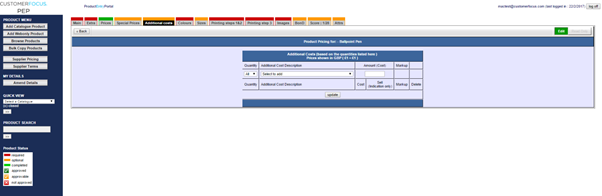
Here is where you can enter your Origination, additional colour print, additional print method and delivery costs here. If you have only one print method, you will need to use the Origination and colour print costs that are associated with that method (e.g. for Screen Print, you’ll need “Screen Print Origination per Colour”, for Laser Engraved “Laser Engraved Origination”). Please see the following guide to matching print types with additional costs here.
Please bear in mind that when you are adding in additional colour print costs, these need to be the difference between 1 colour print and 2 colour print, not that total amount of what 2 colour print is. (If 1 colour is £1 and 2 colour is £1.50, you will need to enter 2 colour print as “0.50p”)
If you do have multiple print methods, we advise that in the PRICES tab you only enter the plain stock price, as this will make entering in the different originations and colour prints here much easier. Please do fill this area in, as you will gain a massive score boost for your product, and the more score you have, the sooner your product is seen in search listings, and will give a boost in sales for your products.
- The COLOURS tab is where you will list all available colours that your product comes in, this isn’t what colours you can print in. We advise all suppliers that list all their colours for each product, and to not separate the product into multiple ones with one colour attached to them, as you will save product space for the catalogue, so long as the prices for each colour are the same. You can add a unique SKU to each colour, ensuring accuracy for quotes and stock level requests.

- With the SIZES tab, you only need to fill this in if you are entering a clothing item. Don’t forget back on the MAIN tab, you must have sizes selected as “yes” and the clothing tick box ticked in order for this to be active.

Similar with the COLOURS tab, you will need to enter in all available sizes that your product comes in, and to not separate them into individual products to save product space, if you can. Also like with the colours, you can assign a unique sku code to each size.
- The PRINTING STEPS 1&2 tab will look like this:
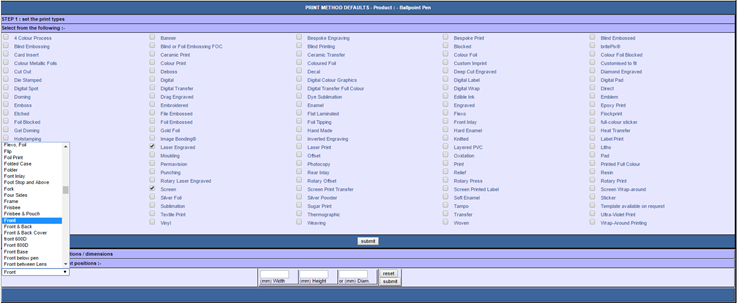
Here you will need to select the print methods that are available for that product, and from the drop down menu select the print area for that product. First you will need to select the methods and hit the “Submit” button before you do any print positions, as if you try to do both things at once and hit “Submit” for the positions, it will not save the methods you’ve selected.
Once the methods have been saved, select the position in which the printed area will be on the product, please make this as specific as possible as it will be used to enable the virtual sample of your products. Then you will need to enter in the print area measurements in mm, either by width and height, or by diameter, you can’t have all three dimensions entered.
- The PRINTING STEP 3 tab is a confirmation of the information entered in PRINTING STEPS 1&2. Here, you can select the positions you’ve entered in, and modify the measurements for each method you have selected (for example if Screen print is larger than Engraved, you can show this as 10x10mm for Screen, 5x5mm for Engraved). Once you’ve made sure of the measurements, tick the boxes next to the measurements and click on “Submit”.


- The last tab that requires to be completed is the IMAGES tab:

Here is where you can upload images to your product (you can only upload one image at a time). Take note that the image does not have to be square and any white space around the product should be trimmed. The pixel size of the image needs to be a minimum of 500x500, with a maximum size of 2000x2000.
We advise that all images must have a white background behind the product, and that it is photographed with each colour individually and at an angle that the print area is shown front facing, this is so that the distributor can make best use of the Virtual Sample and end-users with the artworktool technology.
- The last tab you will need to take note of is the SCORE tab:
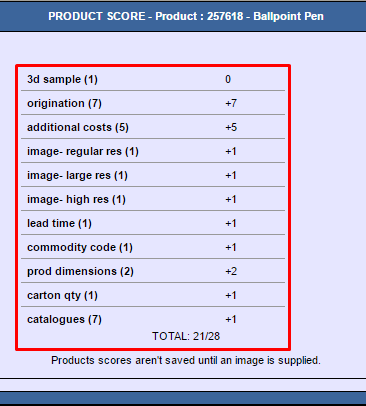
This is where you will find out what score you have got from the data you have entered in for your product and what you are still missing, in order to improve your score.
Here is a short explanation of what you will need for each category you can gain score in:
- 3d sample (1)
If a supplier wishes to get this point, you would need to contact our Technologo office in Sheffield, UK. For a fee, they will be able to showcase your products as a 3d image to display on distributor websites.
Further information can be found here: http://marketing.technologo.com/
- origination (7)
The bulk of the points can be earned from this and the following section on additional costs.
To achieve the 7 points available here, you need to enter any origination prices in to the additional costs section. If you have no origination costs or the origination is free of charge,you can enter these as 0 values to earn the points.
Pay attention to the origination cost you enter. This should be linked to the print types you have available for your product.
For example. If you have an origination of £15.00 per colour on your product that is available screen printed, you would select 'Screen Print Origination per Colour' from the dropdown box.
- additional costs (5)
To gain an extra 5 points, you must enter any other additional costs using the same method as previous. Please note, that origination and any other additional costs are treated separately, and earn separate point scores.
These could include delivery or extra colour charges. In the same manner as originations, printing prices should be linked to your print type.
For example. If your products main price is set to plain stock, you may want to add an additional cost for a 1 colour screen print. In this case, you would select 'Screen Print 1 Color' from the dropdown box.
- image- regular res (1)
- image- large res (1)
- image- high res (1)
Images are mandatory for products on the Product Entry Portal, but you can improve your score by uploading a high resolution image. A high-res image can gain you the combined 3 points. Whereas if you upload one low-res image, you may only get one point. A high resolution image is one over 500 x 500 pixels, and a maximum of 2000x2000 pixels.
- lead time (1)
To gain this point, simply enter the lead time of your product on the main tab screen.
- commodity code (1)
These are entered on the Extras tab. Commodity codes are what determines import taxation classification. They denote what sector a product belongs to.
See http://data.gov.uk/dataset/uk-tariff-codes-2009-2010/resource/0809a872-4df7-42c2-9a29-99e1626870f6
A search tool is available here:
https://www.gov.uk/trade-tariff/sections
- prod dimensions (2)
Enter the dimensions of your product in millimetres in the product dimensions section located on the 'Extra' tab.
- carton qty (1)
Again, located on the 'Extra' tab, enter the carton quantity for your product.
- catalogues (11)
To gain catalogue points, your product must have been listed in any previous catalogue. Like Spectrum 12/13/14 etc. The more catalogues it has been in, the more these points will accumulate over time.
You should aim to achieve a score of at least 17. Beyond 20 is considered a high score.
Once you have filled in all of the various tabs with as much information as you can, and they are showing up green, the product is ready to be approved, but for your products to be approved you must contact the Data team to get your products live on Search and other sites.
If you do have any issues or enquiries that are product data related, please contact Customer Focus on 0844 880 2751, or please email us at data@customerfocus.com.
