VISION QuickBooks Export Help *US Customers Only*
These help guides are aimed at VISION users *US CUSTOMERS ONLY*
I. INTRODUCTION
This manual will show you how to integrate Vision with your QuickBooks accounting software. You will be able to export Customer Information, Sales Invoices and Payments, Vendor Information and fully/partially delivered Purchase Orders from Vision and import them directly into your QuickBooks desktop program. Initially, you will need to setup your QuickBooks account information in Vision so that the information being exported will be added to the proper QuickBooks accounts. After the initial setup of accounts, all future exports and imports will be handled automatically. Exporting from Visions is very flexible in that it allows you to export in batches and/or choose individual transactions. However, in order to have all necessary information included in the Visions export and available for import into QuickBooks, you must follow the proper workflow.
II. SETTING UP ACCOUNT INFORMATION
Users with Existing QuickBooks Accounts:
If you already have accounts setup in QuickBooks, it is IMPORTANT that you map your
existing QuickBooks account fields to the fields within VISION. This way the
corresponding fields will import correctly to your already existing QuickBooks account
fields.
- Sign into VISION: usa.customerfocus.com/vision
- Enter Email and Password
- Click on the Settings, located in the top right corner.
- Hover over System, located on the navigation toolbar at the top of the page.
- Select QuickBooks Mapping from the System dropdown
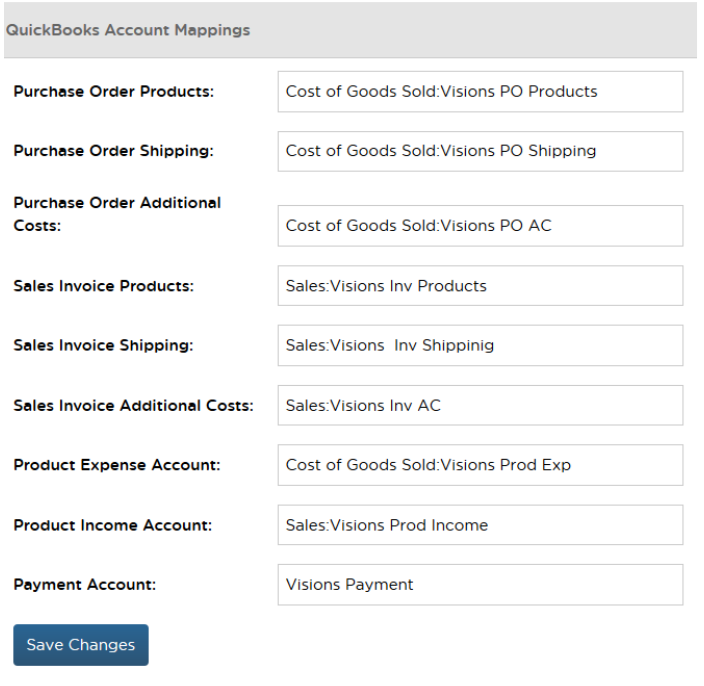
- Fill out the account information
- Click Save Changes
Use the following field descriptions to locate and correctly map Visions to your existing
QuickBooks accounts
- Purchase Order Products: The QuickBooks account where you put your product costs. Most likely a Cost of Goods Sold account
- Purchase Order Shipping: The QuickBooks account you have assigned for the shipping charges you pay to the supplier. Possible a Cost of Goods Sold account or Shipping and/or Freight account
- Purchase Order Additional Costs: The QuickBooks account you use for Setup Fees, Proof Fees and other additional costs associated with an order. Possible Cost of Goods Sold account
- Sales Invoice Products: The QuickBooks account where you capture the amount you charge a Customer for products on an Invoice. Most likely a Sales or Income account
- Sales Invoice Shipping: The QuickBooks account used for shipping fees on a customer Invoice. Possible Sales account, Income account or Shipping and/or Freight account
- Sales Invoice Additional Costs: The QuickBooks account used for capturing additional charges included on a Customer Invoice such as Setup, Proofs, Run Charges, etc. Most likely a Sales or Income account. Product Expense Account: Should be a Costs of Goods Sold account
- Product Income Account: Should be a Sales account
- Payment Account: QuickBooks account where you record payments. This cannot be set to Accounts Receivable. You will most likely have to create a new account for this option.
Setting Up New Accounts:
For those that do not have QuickBooks accounts already setup, use the description information above and establish new accounts names. These accounts will be created for you, in QuickBooks, during your first export/import. Below is an example of suggested QuickBooks account names that can be used when creating mapping accounts: This is only a suggestion. Please use accounts that are appropriate for your individual business.
III. WORKFLOW
The workflow order cycle begins with a valid Sales Order (also known as Order Acknowledgement). Purchase Orders and Sales Invoices are then created from the Sales Order. Purchase Orders are sent and fulfilled by suppliers. Sales Invoices are the final Invoices that are sent to the Customer.
Documents that can be exported into QuickBooks
- General customer Information; such as customer name, phone number, email and address
- Purchase Orders that have been fully or partially delivered
- Sales Invoices that have been printed or sent/shared
Customers
Any new Customers, or existing Customers that have been modified, will be automatically included in your export. The new Customers will be added to your QuickBooks Customer Centre and existing Customers will be updated with the new information. Only main Customer information will be exported. Contact information cannot be exported at this time
Purchase Orders
Only purchase orders that are either fully or partially delivered will be included in your export. To properly receive in a purchase order, and mark it as either fully delivered or partially delivered, follow these steps:
- A Purchase Order must be either printed or sent/shared for the Purchase Order to be at “new order” status
- Select Purchase Orders from the Projects dropdown to view all Purchase Orders and their status
- Purchase Orders that are at “new order” status will have the option “receive PO”
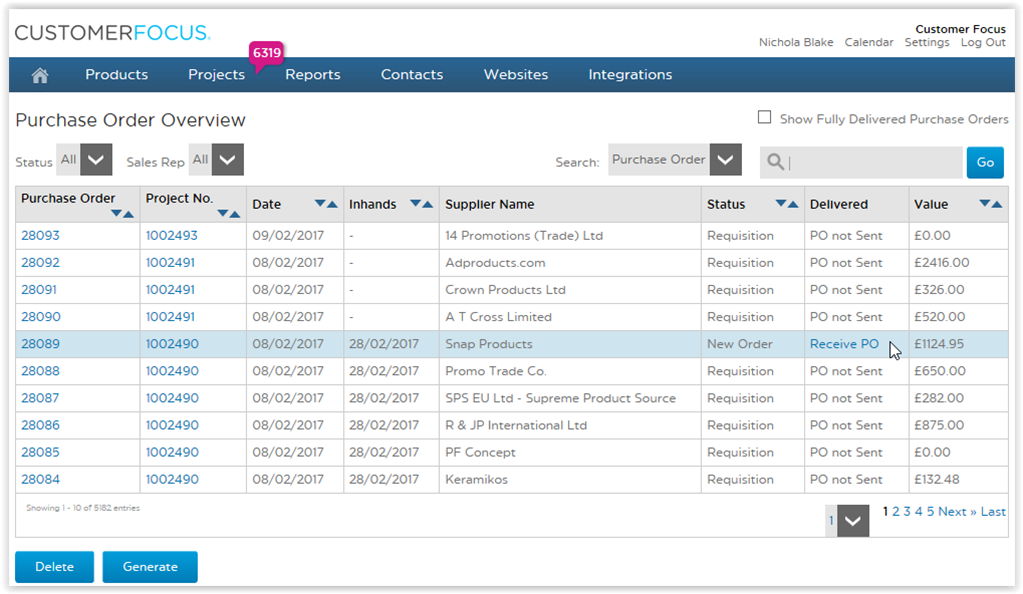
- Click Receive PO to record fully or partially deliver goods that are listed on the Purchase Order
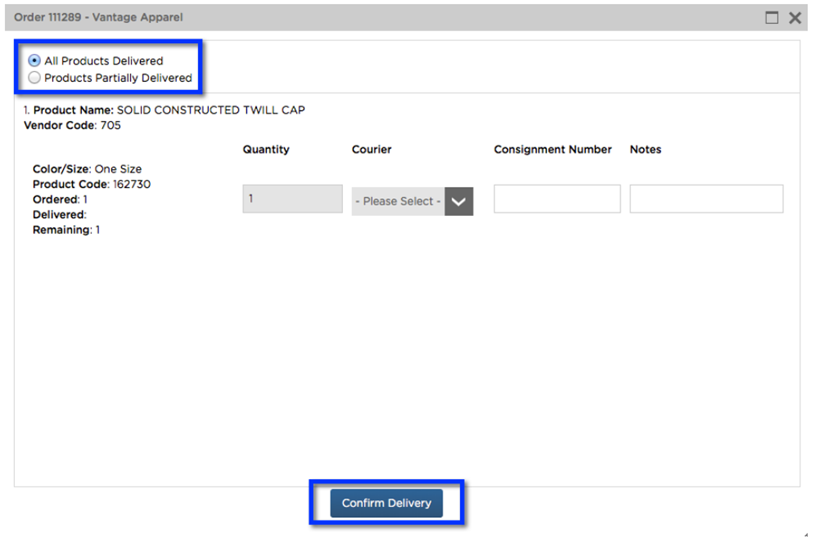
- Select the radio button All Products Delivered or Products Partially Delivered
- Edit the quantity delivered if necessary
- Click Confirm Delivery
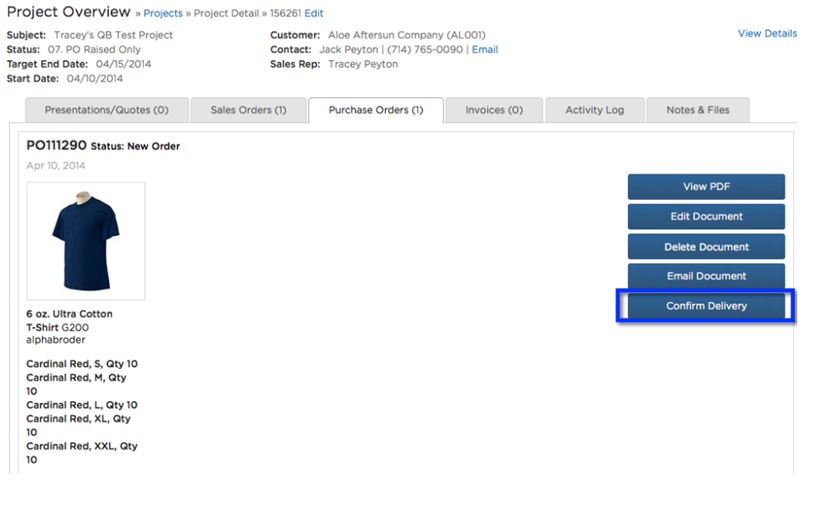
Please Note: You may Confirm Delivery of a Purchase Order that is in “New Order”
status from directly within the Project. Click on the Purchase Order Tab in the Project
and find the desired Purchase Order. Click Confirm Delivery, located to the right of the
screen
To View Fully Delivered Purchase Orders
- Select Purchase Orders from the Products dropdown on the Navigation Toolbar
- Check the Show Fully Delivered Purchase Order box located to the top right of the Purchase Order Overview Screen
- Once delivered, these Purchase Orders can be exported to QuickBooks

Sales Invoices
You will need to either Print or Send/Share Sales Invoices for them to be available for export to QuickBooks. Once a sales invoice has been printed or sent/shared it will be included in the export.
Payments are automatically included in your export for first time exported Invoices. If you are repeating an export you may choose to omit Payments to avoid double entry.
Export to QuickBooks:
- From the projects dropdown click on ‘Sales Invoices’
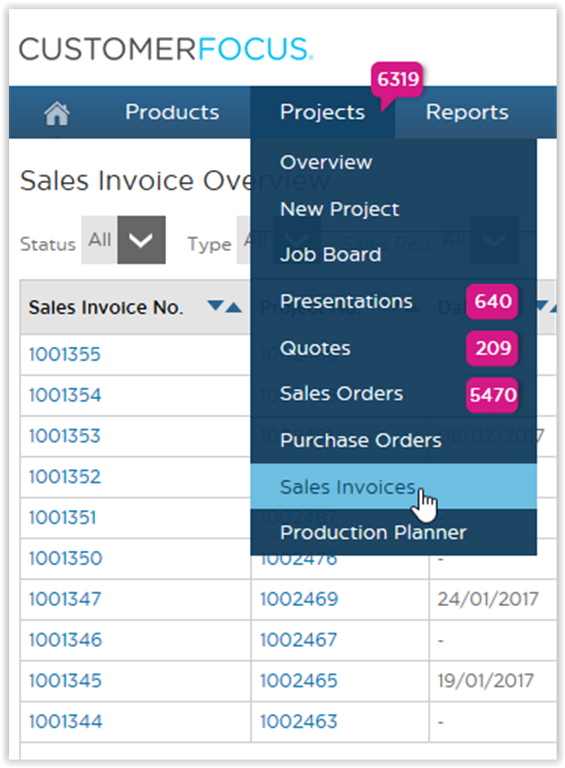
- Form Sales Invoice Overview click ‘Export to QuickBooks’

- Make your selections on the Export Features screen
IV. EXPORT
Below is the interface for your QuickBooks export followed by an explanation of the options
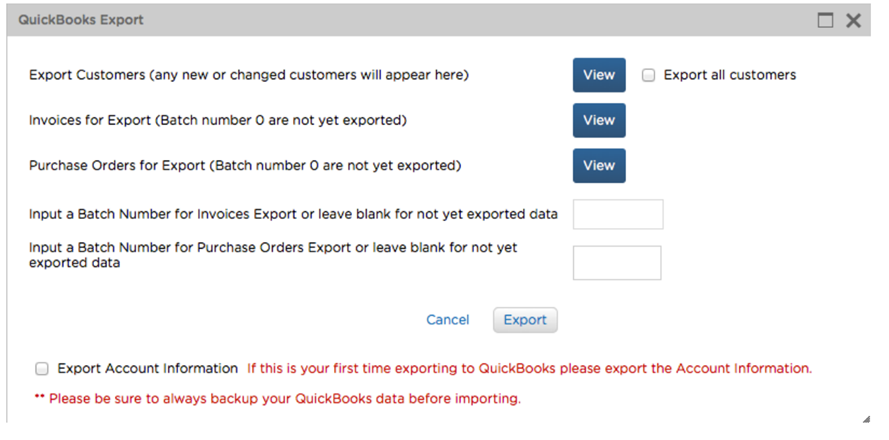
Batches
- Any Vision transaction that is ready and available for export will automatically be included in the next export batch. Non-exported transactions will have a batch number of 0
- When the transaction is exported, new batch number will be assigned. You will need that batch number if you choose to re-export any of the transaction
First time QuickBooks export example process:
- Create a Sales Order
- Convert the Sales Order to a Purchase Order
- Mark the Purchase Order fully/partially delivered
- Generate the Sales Invoice from the Sales Order, Print or Send/Share it
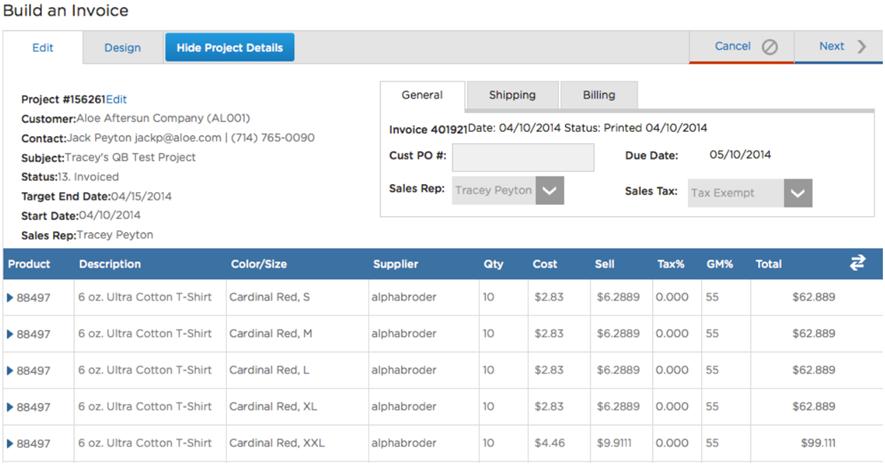
- From the QuickBooks export window, click on View button next to the Invoices for Export line
- Notice each line item from the above Invoice will have a batch number of 0
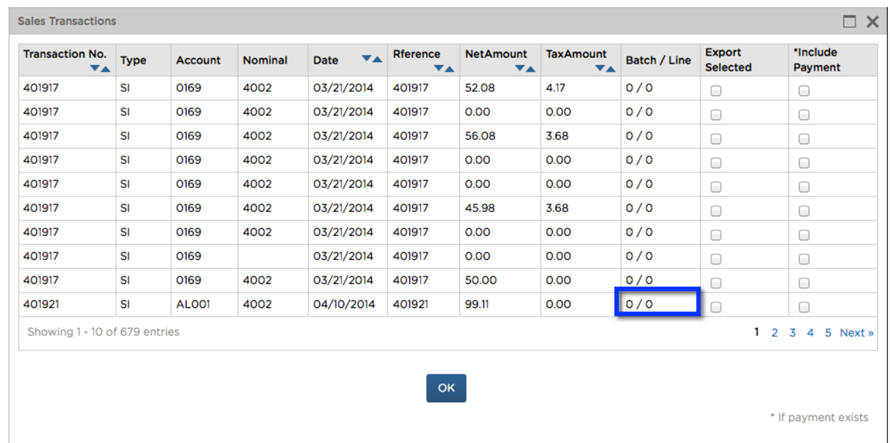
- Close the Sales Transaction window
- Again from the QuickBooks Export window, click on view Purchase Orders. Line items from the received Purchase Order will be listed
- Line items for Purchase Orders that have not been exported with have a batch number of 0
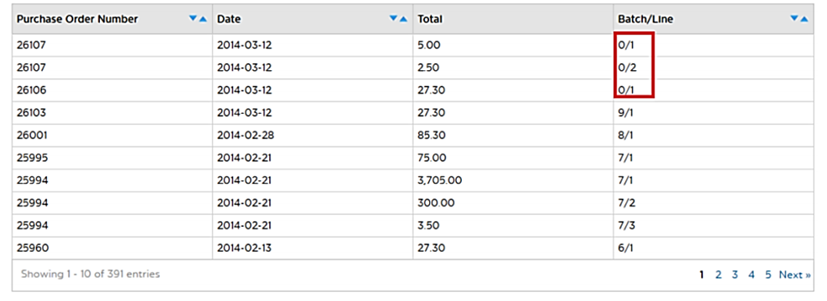
- If the Purchase Order line item has a batch number other than 0, it has previously been exported
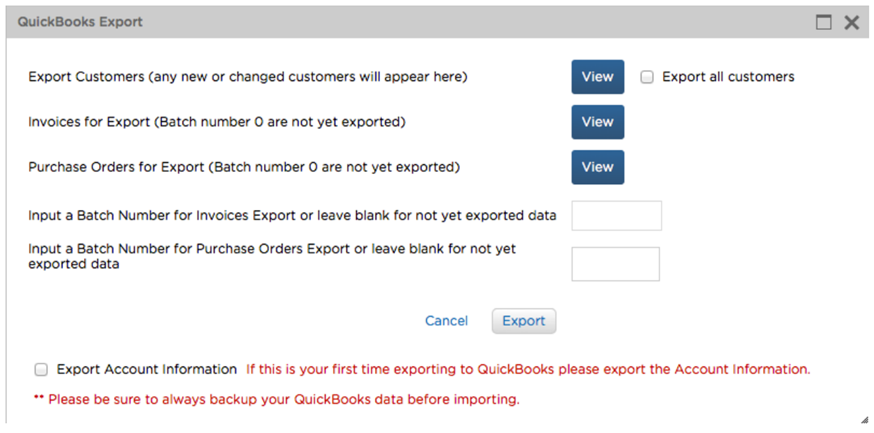
Re-Exporting Batches
- If you would like to re-export a transaction, add a batch number to the designated field the batch will be re-exported. If you leave this blank only new transactions will be exported
- You can check the box Export Selected to choose which transactions you want to export
First time users
- First time QuickBooks export users should check the Export Account Information box to automatically create mapping accounts in QuickBooks
![]()
Saving the Export File
- Click the Export button and save the .iif file
- Save the file to your computer
V. IMPORT TO QUICKBOOKS
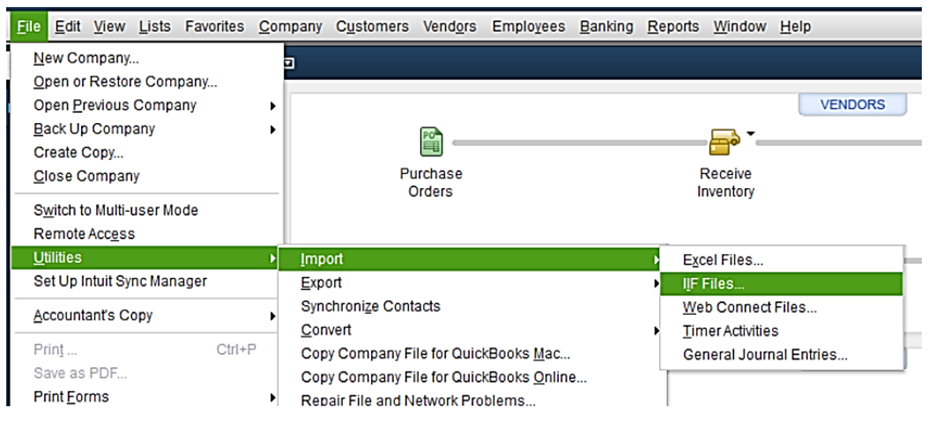
To import the file into QuickBooks follow the steps below:
- From the Toolbar, select File
- Select Utilities from the File dropdown
- Choose Import
- Select IIF File you saved to your computer and import your .iif file
Customer Centre
Customer Information and Sales Invoices will be found in the Customer Centre. QuickBooks will assign the Sales Invoice to a new Job. The new Job will be the same as the Project you created in Vision
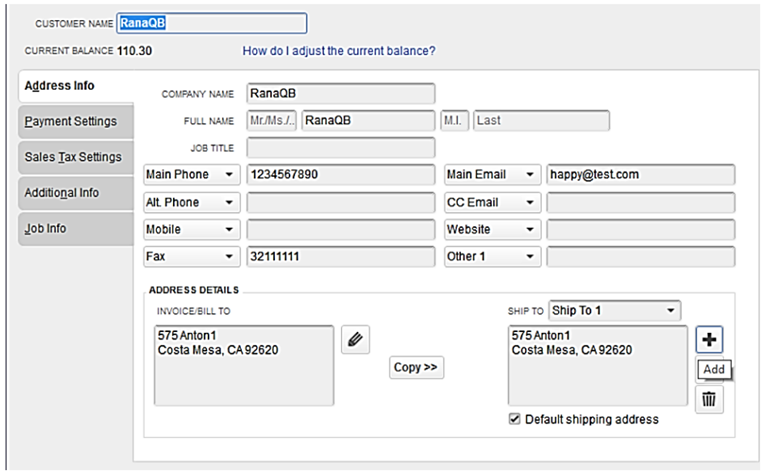
Customer Information
- Select Customers from the navigation toolbar at the top of the screen
- Select Customer Centre from the dropdown

- Double click on the customer that you want to view
Invoices
- Select Customers from the navigation toolbar at the top of the screen.
- Select Customer Centre from the dropdown.

- Choose the customer and select invoices.
- Double click the invoice to view it.
Vendor Centre
Vendor information and Purchase Orders can be found in the Vendor Centre
- Select Vendor from the navigation toolbar.
- Select Vendor Centre from the Vendor dropdown.
- You can view vendor information by double clicking the vendor and look at related Purchase Orders.
Imported Accounts
- You can view the imported Accounts by selecting Lists from the navigation toolbar
- Select Chart of Account from the Lists dropdown
Re-Importing Selected Invoices and Purchase Orders
- If it is necessary, you can re-import Sales Invoices and Purchase Orders into QuickBooks
- Re-export the desired transactions from Vision and import into QuickBooks following the above procedure
- QuickBooks will let you know if the Sales Invoice and/or Purchase Order already exists and will ask you if you want to duplicate them
- QuickBooks does not recognize duplicate Payments on import
- Be cautious when re-importing files into QuickBooks since duplicate Sales Invoices, Payments will affect your financial statements
