Routine Setup Options for the CRM Operations / Job Management Centre
The following help sheet details the available configuration options for the CRM Operations / Job Management Centre.
IMPORTANT NOTES:- Any changes made in Routine Setup are system-wide and will affect all PromoServe users.
STEP 1
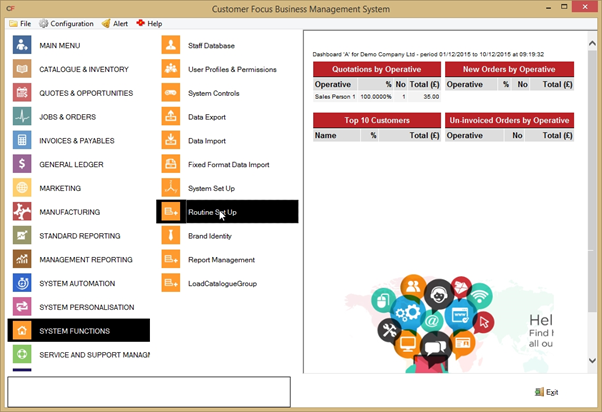
From the main menu, select System Functions followed by Routine Setup.
STEP 2
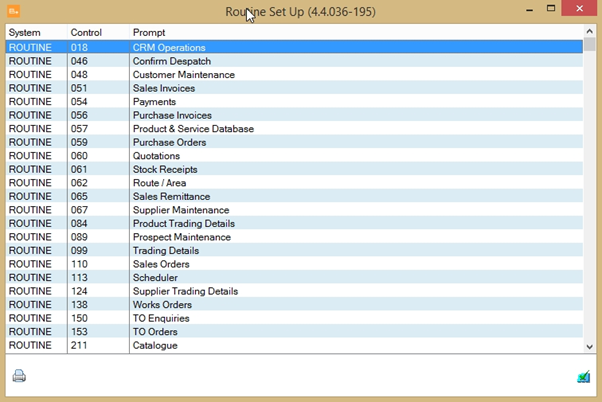
Double left-click CRM Operations from the top of the screen or alternatively left click to select it then click the blue triangle in the bottom-right to modify.
STEP 3
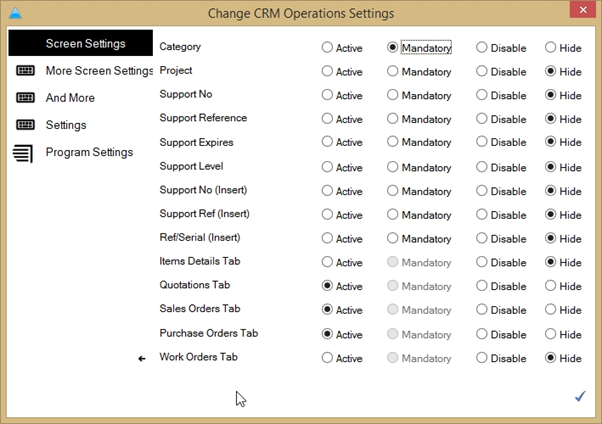
Screen Settings 1 (First Tab)
This tab allows you to configure the behavior of fields within the CRM Operations Centre.
Active = The field will be visible to and accessible by users, but information will not be required to be entered.
Mandatory = The field will be visible to and accessible by users. Information will be required to be entered before the screen can be closed with changes saved.
Disable = The field will be visible to users but will appear greyed out and be inaccessible.
Hide = The field will not be visible to users.
NOTE: Some options will not be available to select on all fields. These options will appear ghosted/greyed out.
STEP 4
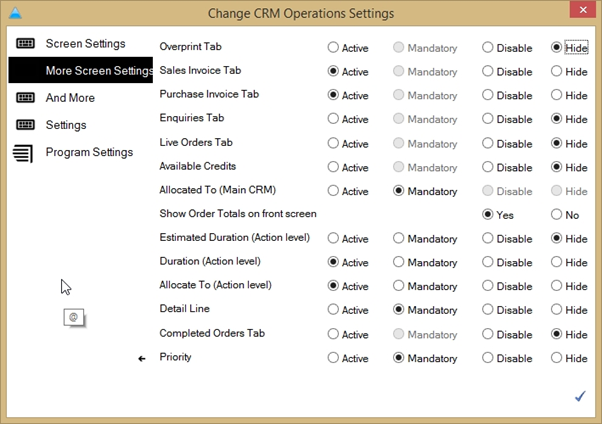
Screen Settings 2 (Second Tab).
Show Order Totals on front screen:-
Yes - Totals for Sales Orders and Sales Invoices as well as expected profit and gross margin will be shown on the Job Management Centre front screen, in the bottom left window.
No - Nothing will be shown in this area of the screen.
STEP 5
Screen Settings 3 (Third Tab).
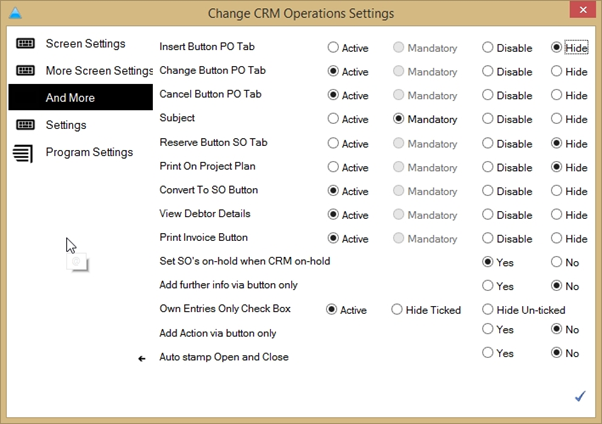
Set SO's on-hold when CRM on-hold:-
Yes - Any Sales Orders which are associated with a Job/CRM will be put 'on hold' if the CRM/Job itself is placed on hold.
No - If the Job/CRM is placed on hold, any associated Sales Orders will be unaffected.
Add further info via button only:-
Yes - The green + button is required to be clicked in order to add any information to the main Notes field on a CRM/Job as opposed to entering the information directly into the Notes field. When notes are added in this way, the date, time and PromoServe UserId are recorded and visible on the notes.
No - Information can be added directly to the main Notes field and no date, time or UserID is recorded.
Own Entries Only Check Box -
Active - All users will see a tickbox within the Sales Orders screen which they can tick/untick if they want to limit the sales orders on screen to those where only they are the Operative.
Hide Ticked - The tickbox will always be ticked and users will not be able to see the tickbox to untick it. This results in users only being able to see Sales Orders where they are the Operative.
Hide Unticked - The tickbox will always be unticked and users will not be able to see the tickbox to tick it. This results in users always being able to see the Sales Orders of all users.
Add Action via button only:-
Yes - The green + button is required to be clicked in order to add any information to the notes area of a Job/CRM action as opposed to entering the information directly into the Action notes area. When notes are added in this way, the date, time and PromoServe UserId are recorded and visible on the action notes.
No - Information can be added directly to the Action notes field and no date, time or UserID is recorded.
Auto stamp Open and Close:-
Yes - When a Job/CRM Action is either closed or re-opened, the date, time and PromoServe UserID is recorded within the notes section of the Action.
No - No date, time or UserID is recorded when Actions are closed or re-opened.
STEP 6
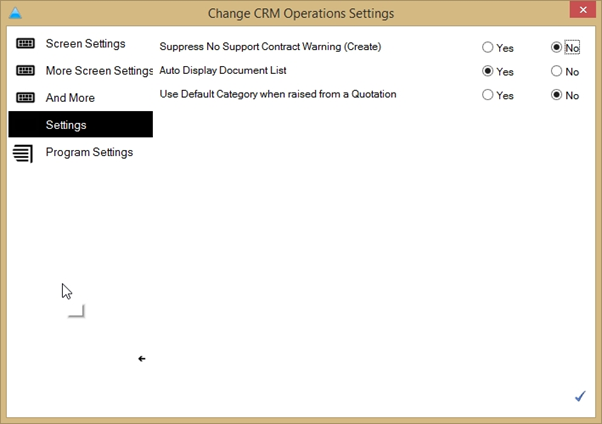
Settings (Fourth Tab)
Suppress No Support Contract Warning –
Yes – A warning message will not be displayed if the system detects there is no support contract connected to the account.
No – The warning message will be displayed as normal.
Auto Display Document List –
Yes – When a job is opened in the CRM, the list of associated documents will be displayed as part of the job.
No – The document list will be hidden from the main screen. You can still view documents by clicking the ‘Click to Display Document List’ button.
Use Default Category When Raised from a Quotation –
Yes – The category will revert to the default value when creating a job.
No – The category will remain as the one assigned during the quotation stage.
STEP 7
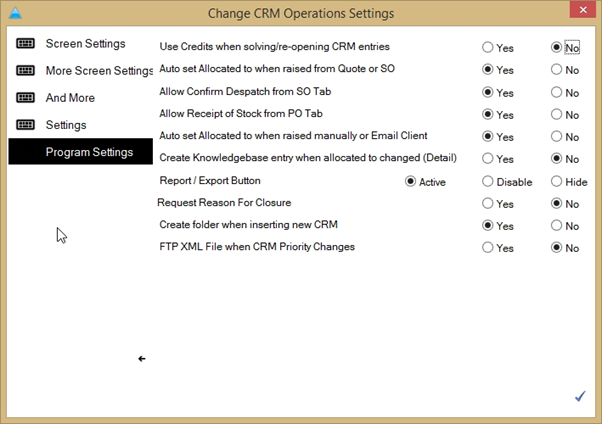
Program Settings (Fifth Tab).
Auto set Allocated to when raised from Quote or SO:-
Yes - When a user creates a Job/CRM directly from a Quote or Sales Order using the '+ Job Bag' button, the Job/CRM will be allocated to that user automatically.
No - A user will need to be manually allocated for the Job/CRM upon its creation.
Allow Confirm Despatch from SO Tab:-
Yes - The 'Confirm Despatch' button will be visible to users on the 'Sales Orders' tab with a Job/CRM at the bottom of the screen.
No - The 'Confirm Despatch' button will not be visible to users on the 'Sales Orders' tab of the Job/CRM. Sales Orders would need to be despatched via the Sales Orders routine.
Allow Receipt of Stock from PO Tab:-
Yes - The 'Receive' button will be visible to users on the 'Purchase Orders' tab with a Job/CRM at the bottom of the screen.
No -The 'Receive' button will not be visible to users on the 'Purchase Orders' tab of the Job/CRM. Purchase Orders would need to be received via the Purchase Orders routine.
Auto set Allocated to when raised manually or Email Client:-
Yes -When a user creates a Job/CRM either manually or via the PromoServe email client using the '+ Job Bag' button, the Job/CRM will be allocated to that user automatically.
No - A user will need to be manually allocated for the Job/CRM upon its creation.
Request Reason for Closure:-
Yes - When a Job/CRM is closed, a screen will be displayed prompting the user to select from a list of reasons for Job closure. The Job won't be closed until a reason has been selected. Reasons can be setup within 'Codes and Phrases' using the phrase type CR.
No - No reason will be required for a Job/CRM to be closed.