HOW TO INSTALL A NEW SQL ENTERPRISE CLIENT
Install ODCB
First a couple of files will be needed, the Promoserve installation files as well as the ODBC Connector.
Firstly go to http://www.customerfocushelp.com/productdownloads and download the Client SQL version as well as the ODBC Installer

Save them in a location you can easily find, the computer’s downloads folder is always a good place.
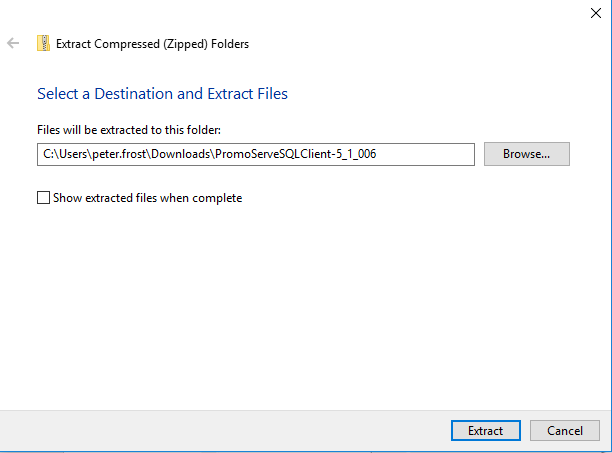
Extract both files by right-clicking on them. Extract them to the current location, this will create a folder with all the necessary files inside.

ODBC installer
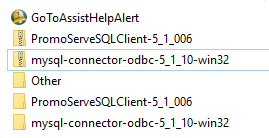
Firstly let’s install the ODBC Connector, go in to the ODBC’s recently extracted folder. There are a couple of installers in here, but we only need one of them.
Double-click on mysql-connector-odbc-5.1.10-win32

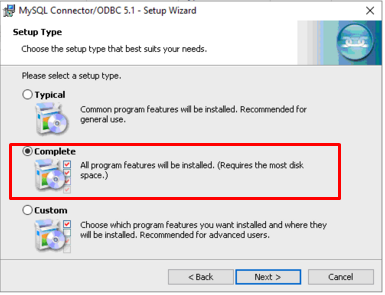
Click Next then select a Complete install
Continue, press Next and Install the rest of this program.
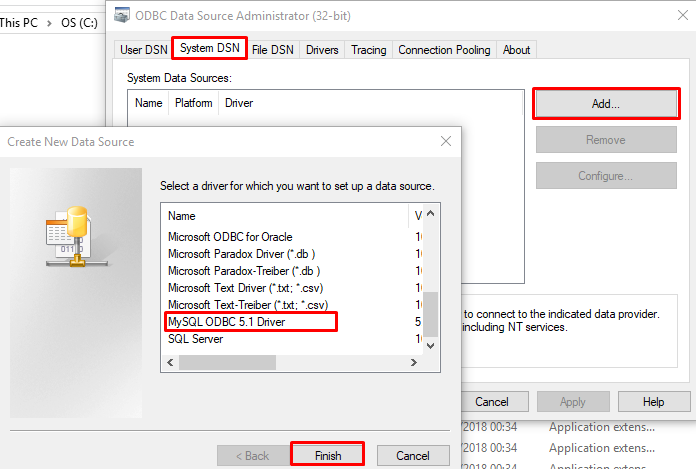
Set DSN in ODCB
You’ll first need to navigate to where your ODBC Connector lives, start up your File Explorer and go to C:WindowsSysWOW64

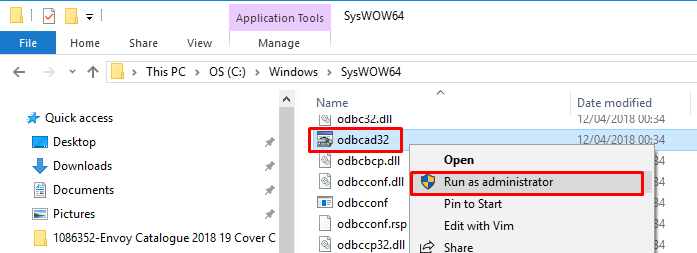
Go to the System DSN tab, click Add, scroll to the bottom of the list and select the MySQL ODBC 5.1 Driver then press Finish
Now you’ll need to input some details. You should already have these, if not please contact us to provide them to you.

Once this is filled in, press OK and that’s the ODBC set up.
Install Promoserve
Now we go to the other Folder we’ve extracted. Start up PromoServeSQLClient-5.1.006 by double-clicking on it, accept the terms and conditions and click next until you get to this screen.
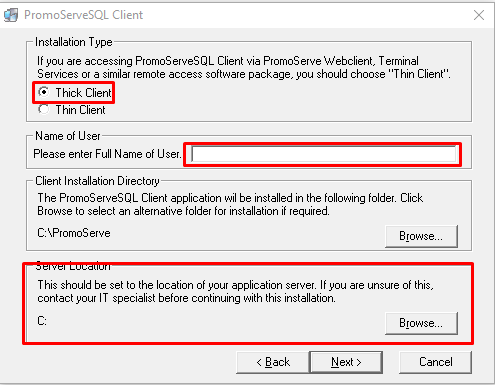
Thick Client is always best here as it will contain everything needed for your Promoserve. Enter the first name of the user who will be using this machine. Leave the Client Installation Directory alone. For the Server Location you will want to set this to your mapped network drive for the Promoserve server. Note: This is not necessarily the V: drive as shown.

Click OK and finish the installation. Not other settings need to be changed for this install.
Now all you need to do is run the new Promoserve icon on the desktop. Double click on this. There will be a window open, remove the “Promoserve” from the lower text box and click the tick to continue.
Enter your username and password, this will grab various files from the server, once this is done you will have to log back in once more. After you’re logged in and can see the main menu test the system by starting up a few of the modules. We recommend Main Menu -> Customers, Main Menu -> Prospects, Quotes and Opportunities -> Quotes and Samples, and finally Jobs and Orders -> Job Management Centre.
Some things that may occur during the installation:
Map Network Drive
If you’re the Customer Focus server isn’t mapped on the network drive, the Promoserve installer will struggle to find it. It’s best to get your IT company to map any necessary drives before starting the installation.
Changing the Pixhall.ini
Sometimes it’s necessary to alter this file. If the installation has gone awry please contact us and we can use remote access to help resolve the installation issue.
Testing Promoserve
After an installation it’s best to test the system to make sure access to the different modules are working properly. This can be done simply by opening the module from the main menu. If data can be access or changed then saved the system is working.
Some areas might be coloured red, this isn’t a problem with the system, access to these areas is just restricted.
