Uploading your PromoServe Knowledge Base to QOP
Step 1 - Export the content of the Knowledge Base from PromoServe
Content MUST be exported as a CSV from PromoServe 'Within the 'Knowledge Base Maintenance' screen, click the 'Export' button...
On the 'Export Knowledge Base' screen, refine which content you need to export. The following screenshot will export ALL content. Click the 'Export' button again to confirm the export of the CSV...
Step 2 - Ensure PromoServe and QOP Codes/References match
When uploading a CSV of your Knowledge Base from PromoServe to QOP, you must ensure that the records within your CSV upload successfully. This is done by ensuring that the 'KB References', 'KB Releases' and 'KB Types' exist in both PromoServe and QOP. For information on adding 'KB References', 'KB Releases' and 'KB Types' in to PromoServe then please click here.
These PromoServe references, releases and types MUST exist within QOP. If not then records may fail to upload and show on your website. Login to your QOP 'Site Admin' and navigate to the 'Codes' menu. You will see 3 further options for 'KB References', 'KB Releases' and 'KB Types'...
Within each relevant menu option simply enter in your PromoServe references, releases and types. The 'Code' and 'Name' must match identically to those in PromoServe...
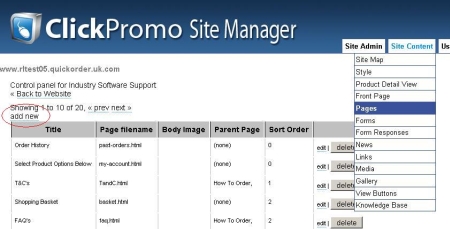
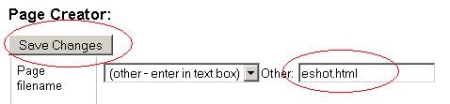
Step 3 - Ensure you have a page called 'knowledge-base.html'
- Login to the 'Site Admin' area of your site and navigate to 'Site Content > Pages' - Insert a new page using the 'pre-defined' name 'knowledge-base.html' from the drop down menu and click 'Save Changes'...Step 4 - Upload your CSV from PromoServe to QOP
Using the 'Data Upload' feature within QOP you can upload the CSV exported from PromoServe to QOP...
- Login to your QOP 'Site Admin' menu and go to the 'Site Admin > Data Upload' screen
- Click to browse for the CSV that you exported from PromoServe in 'Step 1'
- Click 'Next'
- On the following screen select 'Knowledge Base' from the drop down - this is what we are uploading...
- On the next screen that appears you must match the headers within the CSV to the headers that exist in QOP. Use the following to match those CSV headers to ones found in the drop downs in QOP...
|
|
|
| UniqueRefID | (not used) |
| KBReference | Reference |
| KBRelease | Release |
| KBPatch | Patch |
| KBTitle | Subject |
| TypeOfKnowledge | Type |
| KBAccountNo | Account |
| KBAccountType | (not used) |
| KBProductNumber | Product |
| KBEnteredBy | Updated By |
| KBEnteredDate | Date |
| KBEnteredTime | Time since update |
| KBDocumentLink | Document |
| CRMRef | (not used) |
| SP2 | (not used) |
| SP3 | (not used) |
| SP4 | (not used) |
| SP5 | (not used) |
| SP6 | (not used) |
| SP7 | (not used) |
| KBDetails | Detail |
| KBSpecificIssue |
Issue |
- Click the 'Next' button to complete the upload
