Company Warehouse Process Guide
The following guide provides a detailed walkthrough of the procedures the warehouse will need to employ to process Company in stock orders. This includes receiving in stock goods into the system, shipping in stock sales orders out of the system and customer service procedures and guidelines for Company customers.
Table of Contents
Basic Warehouse Functionalities on PromoServe
Section 1: In Stock Product Creation/Purchase Order
Replenishment
Section 2: Notifying the Warehouse of Purchase Order Deliveries/Chasing Late In Stock Purchase Orders
Section 3: Quality Control - Receiving In Stock Purchase Orders in the Warehouse
Section 4: Receiving Goods into Stock in PromoServe
Section 5: Rejecting Damaged Goods from an Incoming Purchase Order
Section 6: Transferring Items into a Quarantine Location
Section 7: Transferring Items in Quarantine Back to Stock in PromoServe
Section 8: Quarantined Items that need to be rejected in PromoServe
Section 9: Transferring Stock from One Bin Location to Another
Section 10: When In Stock Orders Meet the Vendor Minimum
Section 11: Shipping (Dispatching) Orders from PromoServe
Section 12: Storing Internal Warehouse Shipping Notes Against
A Sales Order
Section 13: International Shipments – Policy and Printing a Commercial Invoice to ship the orders
Section 14: Stock Takes
Section 15: Putting Products with Zero Stock Counts in Test Mode in PromoServe
Company /Warehouse Customer Service Business Processes
Section 16: Notifying Customers of Back Orders or Discontinued Products
Section 17: Order Cancellations
Section 18: Credits & Returns
Section 19: Exchanges
Section 20: Warehouse Picking Errors
Section 21: Changing Customer Ship to Addresses on an Existing Sales Order
Section 22: Changing a Ship Method on an Existing Sales Order
Section 23: Tracking Number Requests from Customers
Section 24: General Tips When Contacting a Company Customer
Section 25: Special Requirements for Client in Stock Orders
Section 26: Donations to Charity/Disposing of “Unsalable” Products
Section 1
In stock product creation and in stock purchase order replenishment
Company teams are responsible for the following:
a) Creates in stock products in PromoServe
b) Raise purchase orders against the in stock products in PromoServe and sends to vendors for processing and shipping to the warehouse
c) Controls the reorder levels and reorder quantities of in stock products
d) Chases the vendors for estimated ship dates of the in stock purchase orders
e) Monitors the in stock quantity levels and turns products ON and OFF the eStores based on availability.
List individuals here
Section 2
Notification to the warehouse of expected purchase order deliveries
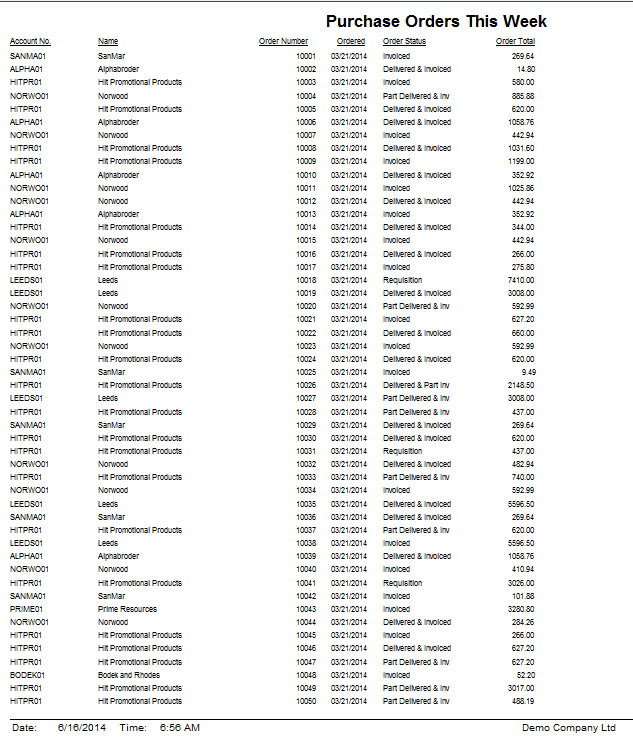
To notify the warehouse of purchase order deliveries expected for that week, an automatic report will be emailed every Monday morning at 6 a.m. CST notifying the warehouse of expected purchase order deliveries that week. This auto-report will be created by Said user at Company. If any changes need to be made to this report, please notify User at (emailaddress@email.com). An example of the report is below.
PURCHASE ORDERS EXPECTED THIS WEEK
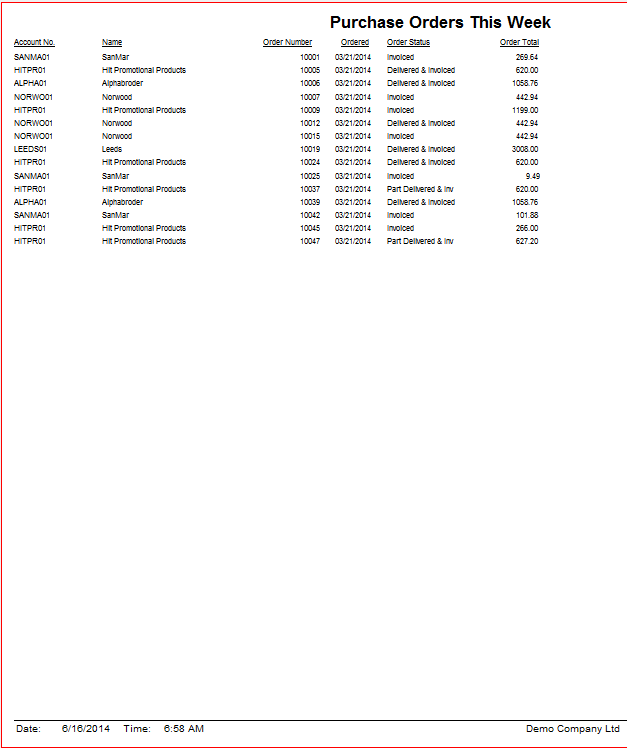
Company requests that the warehouse contact the vendor if the Purchase Order due to be delivered does not arrive on its promised date (indicated in PS). An auto-report will be generated and sent to the warehouse every Monday at 6:15 a.m. indicated what Purchase Orders are outstanding and past their promised date. An example of this report is below.
Section 3
Quality control – receiving in stock purchase orders in the warehouse
Products should be clean, in working order and on brand. When receiving in stock product in the warehouse, all purchase order receipts must be received in with a quality control audit. Company defines a quality control audit as completely counting and checking the brand on each product on all incoming purchase orders. For example, if 40 dozen golf balls are received at the warehouse, the warehouse is asked to count to make sure there are 40 boxes of a dozen/each, confirm that there are 4 sleeves within each box and finally, confirm that the branding on the product matches that of the image in PromoServe.
Another example of quality control that meets Company standards are packs of pens. If a purchase order receipt comes in for 30 packs of 10 pens, the warehouse is asked to count the packs and “eyeball” to make sure there are 10 pens in each pack. The warehouse is also asked to make sure the pens are marked with the correct branding by comparing the branding to the image in PromoServe.
Please use the images in the Inventory section of PromoServe to confirm that the image on the product matches the image in the Stock Database. To see the image in the Stock Database, please follow the instructions below.
Click on the Inventory button under 'Catalog & Inventory.'
Enter the in stock product number in the search field at the top of the screen and click the TAB key.
Double click on the product line item to open up the product information card. It should appear like the below.
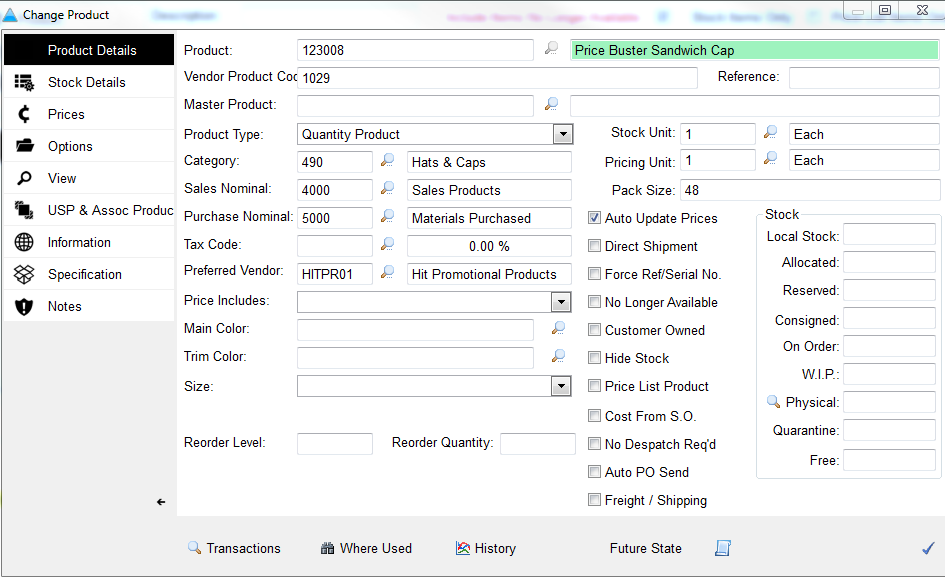
Click on the View tab at the top of the screen and you should see the image of the in stock product. Please use this image for quality control for incoming purchase orders.

*3/3/09 Note: Company requires 100% quality control at this time. Company asks this of the warehouse to make sure the same mistakes encountered with the previous warehouse are not carried over into the new warehouse. In addition, while the economy is a bit sluggish, Company wants to confirm that the few purchase orders received in at this time are 100% acceptable. As the economy improves and the inventory cycle picks up, Company may consider revisiting this process and revamping (example: possibly only doing a full count on POs received in with a unit cost of $10.00 or higher). This is an example only and does not reflect Company’s current quality control policy as stated above.
Section 4
Receiving goods into stock
An example product will be used to demonstrate how goods received in the warehouse can be booked into stock in PromoServe. In this example we will use a current in stock item: ATTWWL2056 - AT&T Sphere Mouse Pad. The vendor is World Wide Lines.
In this scenario, we will assume that purchase order1002 has been raised by the IAM requesting the replenishment of 100 ATTWWL2056 - AT&T Sphere Mouse Pads (order raised and submitted to vendor from the IAM). At this point goods have been received in the warehouse. The warehouse is now in a position to book the goods into PromoServe. Please follow the instructions below.
Click on the ‘Goods Inwards’ button under 'Jobs & Orders' in PromoServe as shown below.

On selection, enter the purchase order number in the search field and hit the TAB key. You will be taken to the purchase order you are searching for as shown below.

Highlight the relevant Purchase Order that has been delivered (the purchase order you want to receive in) and then click 'Receive All’ on the bottom right of the screen. The following window will then appear.
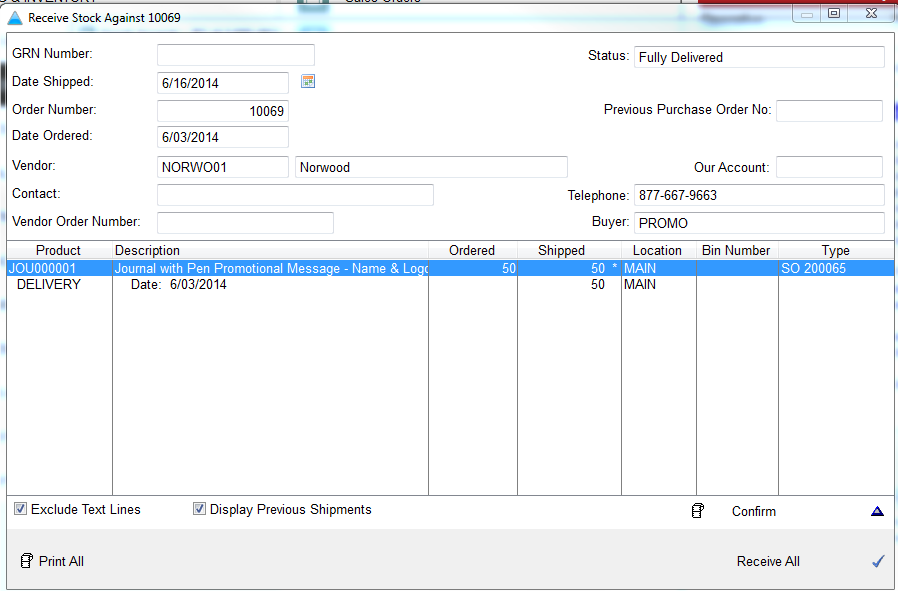
If Qty 100 has been delivered you can either click on the ‘Receive’ button (bottom right). If the warehouse needs to assign a specific location and bin number to the delivery click on the blue triangle button (bottom right) and enter the specific location and bin number. (Most items should already have a bin location and number assigned to the product in the stock database.)
TIP – The next time you receive another delivery in for this product, PromoServe will remember and display the previous location and bin number.
At this point you need to enter the quantity received and use the magnifying glass to define the location where the goods will be housed in the warehouse. In this case, the location would always be “MAIN” for main warehouse. Bin numbers can be assigned either by using the drop down or overtyping within the available textbox as shown below. Using this example, if all 100 have been received in, please check the “Fully Delivered” checkbox. If not all 50 received, please do NOT check Fully Delivered.
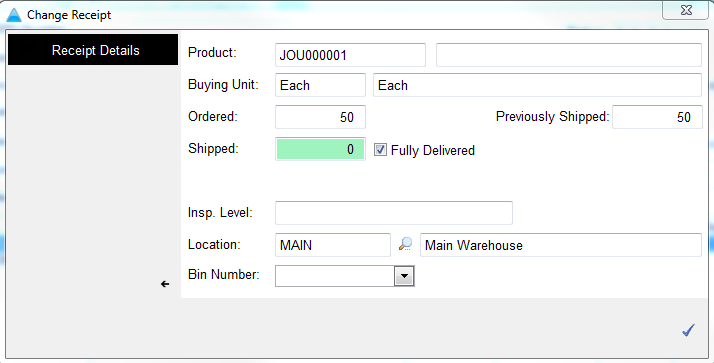
Click on the blue checkmark button (bottom right) and you will return to the previous screen that now details the location and bin number entries as shown below. Per the example, the items are now in location: Main and bin number: A1.

EXCEPTION: There are times when you will receive a PO from the vendor and they will send you less pcs than what is stated on the PO. When this happens, DO NOT receives it in as a full receipt as Company Accounting will want to know about this so Company is not billed for pcs we never received.
In order to check that the goods have been correctly booked into stock, please follow the instructions below.
Enter the Stock Database, found on the main screen in PromoServe.
Enter the product number at the top and hit TAB to locate the specific product entry. Double click on the line item to open up the product information card and the below screen will then be displayed. In this example, we can now see that 100 new items (per our original example) have been booked into stock (per the bottom right area of the screen shot below). If you were to click on the ‘Transactions’ button, bottom left of the screen you will see a line entry that essentially details the ‘receipt’ of the goods.
After you have confirmed that you have entered the stock correctly against the product, please make sure that “Price List Product” is checked. This can be found on the Product Details tab as shown below. If not checked, please include a check in the checkbox and then hit the blue checkmark at the bottom of the screen. If “Price List Product” is not checked, it means the item is in test mode and off the store until a sufficient stock quantity is entered against it.
Explanation of what each “stock” field means is below.
Local Stock – PromoServe has the ability to handle multiple warehouse locations; however, for Company this feature is not being utilized at present. Local Stock therefore, will always reflect the physical stock level at the MAIN Company warehouse.
Allocated – This indicates that there is a sale order or sales orders currently on the system that make up the quantity of the allocation.
Reserved, Consignment, WIP – not currently used for the Company warehouse.
On Order – Indicates that there are outstanding purchase orders on the system for this in stock product due for delivery from the vendor.
Physical – Indicates the number of pieces the warehouse physically has in the warehouse including allocations.
Free Stock – Essentially physical stock minus the outstanding allocation
TIP – to find out what sales orders make up the Allocated quantity and what purchase orders make up the On Order quantity, click on the ‘Future State’ button from within the Inventory Database.
This shows you the sales order and purchase order numbers that make up these quantities. Also important – it indicates the in hands date of the purchase orders (expected date they are due in the warehouse) as shown below.

TIP - To easily trace the movement or transactions of a product whether it be a shipment of a sales order, a receipt of a purchase order, a stock transfer, a manual stock increase/stock decrease, the “Transactions” button (bottom left of the product information card) will detail the historical transactions behind that product.
On selection a screen similar to the below will be displayed.
TIP - When goods are received into stock, the receipt is recorded and this is stamped against the ‘Stock Details’ Tab located within a Product record card. To see this please follow the instructions below.
TIP - a sales order (SO) is what is placed by the client to Company and the purchase order (PO) is what is placed by Company to the vendor
Open up the product information card which can be found under the Stock Database button. You will see a screen similar to the below.

Click on the Stock Details tab as shown below.
![]()
On selection a screen similar to the below will be displayed.

When goods are booked into stock, a Stock Detail transaction line is recorded. These details can be viewed by clicking on the blue triangle button (bottom right).
It’s at this point that stock can be manually increased or decreased by changing the quantity figure in the quantity field as shown below. You also have the ability to change the bin number if necessary.

TIP – The Vendor Details Tab as shown above, stores the vendor’s product code and this will appear on purchase orders when they are raised for this product so that the vendor can relate to this product.
Section 5
Rejecting damaged goods from an incoming purchase order
Company has zero tolerance for damaged or “unsalable” goods. If an item is damaged upon receipt at the warehouse, the warehouse will always email the vendor. The vendor will be informed that we are rejecting X amount of product because they are damaged and that we will return the items if needed (get vendors shipper number) and a credit needs to be issued to Company.
To acquire the vendor’s contact information please follow the instructions below.
Click on the Purchase Order button on the main screen of PromoServe
Enter the purchase order number in the search field at the top of the screen and click the TAB key.
Double click on the purchase order line item
Click on the Contact tab for the vendor information
There the warehouse can obtain the vendor’s email address and phone number.

When sending an email to the vendor, please use the format below.
TO: Vendor
CC: accounts@Company.com (accounting email); accounts@Company.com
RE: DAMAGED GOODS – PO#4417
Dear Vendor:
We have received PO #XXXX in our warehouse. Unfortunately, XX are damaged upon arrival. We can return the items if requested but we do require your shipper number to ship the damaged goods back to you. Please be sure that you issue a credit to Company for the XX damaged goods. Please note to REPLY TO ALL with your response.
Thank you.
The Company Fulfillment Center
In regards to the damaged goods, the warehouse will need to reject them in PromoServe. Please follow the instructions below.
Going back to our example as previously documented we will now reject 10 of the 100 items delivered as they are damaged. Un-receipting/Rejecting stock is performed within the ‘Goods Inwards’ routine as shown below.

On selection, you must first ensure that the ‘Exclude Fully Delivered’ checkbox (upper right corner) is not ticked as shown below. You should therefore be able to see the previous purchase order you have previously received as “fully delivered” into the system as shown below.

Highlight the relevant purchase order line entry (in this scenario World Wide Lines PO 1002.
Click on the green checkmark button (bottom right). The following screen will then be displayed.

Double click on the highlighted purchase order line item.
Highlight the ‘DELIVERY’ line as shown below.

Double click on the line entry and the following screen will then be displayed.

In our example, 10 AT&T Sphere Mouse Pads will be rejected as they are damaged. Click within the ‘Rejection’ radio button (as shown below) and enter the quantity to be rejected as shown below.

To proceed with the rejection click on the blue checkmark button, (bottom right) and the screen below will then display, (similar to receiving in stock) asking for a reason for the rejection. Select or enter a reason for the rejection and continue by clicking on the blue checkmark button (bottom right).

You can check to ensure that the goods have been rejected in the Stock Database. Please follow the instructions below
Click on the Stock Database button on the main menu of PromoServe
Enter the product code in the search field at the top of the screen and click the TAB key
Double click on the product line entry and the product information card will appear as shown below.

TIP – Click on the Transactions button (bottom left) and you will see that a line entry has been recorded detailing the rejection.
TIP – Only reject stock if is completely damaged.
Section 6
Transferring items into a quarantine location
Definition of Quarantine: Items that are in a questionable state. Items are not damaged but could be off brand, logo is placed on the wrong location, etc.
Going back to our example as previously documented the warehouse will now put 10 of the 100 items delivered in quarantine. Rather than completely rejecting the stock, the warehouse will put them in a quarantine area until they can be reviewed and possibly put into stock. To quarantine product please follow the instructions below.
Click on the Stock Database on the main menu of PromoServe
Enter the product in the search field and click the TAB key as shown below

Double click on the product line entry to open up the product information card.
Notice below that all 100 are in free stock quantity.

Click on the Stock Details tab in the Stock Database
Click on the Transfer button (bottom right)

In this screen, the warehouse is not transferring product to another product. The warehouse is transferring to same product.
In the “To Product Details” area, enter the same product number.
Notice the location defaults to Main. The warehouse wants to transfer to the location of Quarantine

Click on the magnifying glass next to Store Location under “To Product Details” to open up the screen below.

Select the Quarantine location and enter the number of items that need to be placed in quarantine. In this example, it will be 10 as shown below.

Hit the perform transfer button and the warehouse now has 10 in quarantine as shown below.

To confirm that 10 of the items have been moved to quarantine please follow the instructions below.
Click on the Stock Database button on the main menu of PromoServe.
Enter the product number in the search field and hit the TAB key.
Double click on the product line item.
Below is an example that 10 are in quarantine.

At this point the warehouse can take a digital picture of the item and send via email to the IAM (merchandiser). The merchandiser will be able to tell the warehouse if the product(s) are acceptable for stock. They can confirm if the branding is correct and in the right location. The contact information for the IAMs is below.
*Add emails here
Section 7
Transferring items in quarantine back to stock in PromoServe
After review and the quarantined items are acceptable for stock, the warehouse can add the quantity back to stock in PromoServe by following the instructions below.
Click on the Stock Database button on the main menu of PromoServe.
Enter the product number in the search field and click the TAB key.
Double click on the product line entry to open up the product information card.
Click on the Stock Details tab as shown below.
Click on the quarantine line item as shown below.

Click the transfer button.
Again the warehouse is not transferring to another product. They are transferring to same product in the “To Product Details” area.
The location under “To Product Details” will default to Main. The warehouse does not need to select another location. The warehouse can simply enter 10 in the Transfer Quantity field as they are transferring the 10 back to the Main location as shown below.

Notice in the below screen that the warehouse now has 90 and 10 in the main location or main warehouse.

Section 8
Quarantined items need to be rejected in PromoServe
The warehouse has 10 items in quarantine and the Company merchandiser replies stating that the 10 items should be rejected as they are off brand. The warehouse will need to notify the vendor and Company accounting so that vendor is aware of what is off brand and why and so accounting can be sure not to pay for the items that are off brand as they cannot be sold on the client e-Store.
When sending an email to the vendor, please use the format below.
TO: Vendor
CC: accounts@Company.com (accounting email)
RE: OFF BRAND – PO#4417
Dear Vendor:
We have received PO #XXXX in our warehouse. Unfortunately, XX are off brand and cannot be sold on the client e-Store. We can return the items if requested but we do require your shipper number to ship the off brand goods back to you. Please be sure that you issue a credit to Company for the XX off brand goods. Please note to REPLY TO ALL with your response.
Thank you.
The Company Fulfillment Center
Please note that Company has an accounting team for each client so be sure to include the appropriate accounting distribution list. They are listed below.
Add emails here
In regards to the off brand goods, the warehouse will need remove them from quarantine status and reject them in PromoServe. To reject these 10 items from quarantine please follow the instructions below. Here the warehouse is performing a manual stock reduction.
Click on the Stock Database button on the main menu of PromoServe.
Enter the product number in the search field and click the TAB key.
Double click on the product line entry to open up the product information card.
Click on the Stock Details tab as shown below.
Click on the quarantine line item as shown below.

Click on the blue triangle button and a screen similar to the below will appear.

Change your quantity to 0 as shown below.

Click blue checkmark button.
As before the system will ask you for a reason as shown below. Please select or enter the reason.

Click the blue checkmark button.

To confirm that the 10 items have been rejected please follow the instructions below.
Click on the Stock Database button on the main menu of PromoServe.
Enter the product number in the search field and click the TAB key.
Double click on the product line entry to open up the product information card. In the below screenshot, we can confirm that the 10 are gone and only 90 are free stock.

Section 9
Transferring stock from one location to another
Stock transfers are carried out within the Stock Details tab within a product record itself. Refer to Product ATTWWL2056 AT&T Sphere Mouse Pad - quantity 10 will now be transferred into a different bin number. Please follow the instructions below.
Click on the Stock Database on the main page of PromoServe.
Enter the product number in the search field and hit the TAB key.
Double click on the product line to view the product record card as shown below.

Click on the Stock Details tab as shown below.

At present, a quantity of 90 mouse pads are in the Main Warehouse in Bin A001. In order to transfer 10 mouse pads into a different bin but within the same Main Location click on the ‘Transfer’ button, ![]() (bottom right) and the following screen will then be displayed.
(bottom right) and the following screen will then be displayed.

In this example the ‘To Product Details’ (found in the middle of the screen below) refer to the same product as we are not transferring the quantity or stock level to another product number but simply to a different bin number. Therefore, in the ‘To Product Details’ area enter the same Product Code – ATTWWL2056. Using the magnifying glass click to the right of Store Location and select the location (which would be MAIN for main warehouse) and enter the new bin number you wish to transfer 10 mouse pads to, in this example B001.Your screen should now look similar to the below.

To complete the transfer click on the “Perform Transfer” button (bottom left of screen above). The software will now indicate that the transfer is complete as shown below.

The warehouse will return to the ‘Stock Details’ tab for the product that will now indicate the transfer of the stock as shown below. The warehouse has 80 Mouse Pads in the Main Warehouse – Bin A001 & 10 Mouse Pads in the Main Warehouse in Bin B001 as shown below.

Section 10
When in stock orders meet the vendor minimum
At times, a customer might order a large quantity of an in stock product that meets our vendor minimum (the first column minimum from the vendor). To help ensure that a customer does not eat up all the stock in the warehouse, Company requires we offer the customer the opportunity to turn that order into a special order (drop ship from the vendor). In this case, the warehouse will need to follow the instructions below.
To find out the vendor minimum of an in stock product, please follow the instructions below.
Click on Stock Database on the main menu of PromoServe.
Enter the in stock product number in the search field and click the TAB key
Double click on the product number line item to open up the product information card. The screen should appear like the below.

Click on the Notes tab of the product information card. The Notes tab includes what the vendor minimum is for that product as shown below.

Close out of the Stock Database and click on the Sales Orders, Invoices & Shipping Database on the main menu of PromoServe
Enter the Sales Order number in the search field and click the TAB key
Double click on the sales order line item to open up the sales order and click on the Shipping/Payment tab as shown below.
Click on “Hold Dispatch” to put the order “On Hold” and in the Notes field enter:
Order on hold; confirming if customer can wait for order and process as a special order.

Send the below email to the customer:
TO: Customer
CC: Company OTC, Company Accounting
FROM: Company Warehouse
SUBJECT: AT&T e-Store - VM - SO # 1234567
Hello Mr. Smith:
We are in receipt of your order for 100 AT&T Mouse pads. Thank you very much for your business.
If you do not have a critical in hands date to receive this product we would be happy to send this order to the manufacturer and have them drop ship the order directly to you. Production time for a drop shipment is generally 7-10 business days. Please allow 3-4 days transit time.
If you would like to take advantage of this offer, please contact us by (email) or (phone) within 24 business hours. If we do not receive a response from you within 24 business hours, we will ship the items from our warehouse. If we do not have enough stock to fill your order, any remaining quantity will go on back order.
Thank you and we look forward to your response.
The Company Fulfillment Center
Fulfillment Center Phone Number
Fulfillment Center Email Address
TIP - VM = vendor minimum
If the warehouse does not hear from the customer within 24 business hours, warehouse should take the order off “Held” status and ship the order or if not enough in stock, ship what is available and leave the rest on backorder.
If the customer confirms they can wait and wants the order to be sent directly from the vendor, the warehouse should follow the below instructions:
Forward the email confirmation from the client to (see below):
TO: Company OTC
CC: Company Accounting
FROM: Company Warehouse
SUBJECT: Fwd: AT&T e-Store – VM - SO #1234567 - change to a special order
Company OTC: Please change SO # XXX to a special order. Customer has agreed to wait for a ship direct from the vendor.
OTC, please follow the instructions below.
OTC will open up the sales order and add the special order product code to the order.
OTC will adjust the quantity the customer needs and will adjust the pricing so it reflects the in stock item sell price.
OTC will delete the in stock product line item from the sales order. (What this does is then adds the allocated in stock item back to “free” stock and it removes the in stock order from the warehouses ship list.)
Freight does not have to be reconfigured. Leave the freight alone.
OTC will remove the “Held” status from the order.
OTC will create a PO off the back of the sales order and send the purchase order to the vendor and process accordingly.
OTC emails the customer as a courtesy letting them know that the order is now with the vendor.
Section 11
Shipping orders from PromoServe
Here the Warehouse & Shipping routine will be used to allow the warehouse to view only ‘In-Stock Orders available for Dispatch’. The routine itself is located on the main menu of PromoServe. In this example, we have deliberately created a Sales Order for the in-stock item we have been working with:
ATTWWL2056 – AT&T Sphere Mouse Pad – for the Quantity 50. On entry to the Warehouse & Shipping screen the following orders are listed at present (see below).

Notice at present our In-Stock Sales Order appears but there are also Drop-Ship orders also listed that are completely irrelevant to the warehouse. Therefore, when the warehouse uses this routine, they should ensure that the ‘Shippable Only’ checkbox is ticked. This will only display In-Stock sales orders where stock currently exists to fulfill the orders. When checked the screen will look similar to the below.

In order to process the order we advise to begin with a Picking Note. A Picking Note is printed via the printer icon (bottom right of the Warehouse & Shipping screen). When printing a Picking Note always use “Format A” and “Print with Header”, as shown below towards the bottom right of the screen shot. When the goods are ready to be shipped, a warehouse operator will click on the ‘Green Check Mark’ (bottom right of screen) below.

The following screen will then be displayed.

At this point this point the Kewill system will be introduced – the order is shipped and tracking numbers are entered within the section below. When using this routine manually, tracking numbers should be entered in the 2 fields below. If additional tracking numbers exist they should be entered in the ‘Additional Text’ box below.

Section 12
Storing internal fulfillment notes against an order
If internal fulfillment notes need to be added to a sales order they should be added against the sales order itself. The sales order can be accessed by clicking on the following button (see below). This button can be found on the main screen of PromoServe.
![]()
On selection, a complete listing of PromoServe sales orders will then appear (this includes in stock and special order sales orders).
Enter the sales order number in the search field and hit the TAB key.
Double click on the sale order line item.
Click on the ‘Shipping/Payment’ Tab – enter additional details in the notes section.
![]()
Section 13
International Shipments – Policy and printing a commercial invoice for international shipments
Company policy on international shipments from Eighth Floor
- Before the order is shipped out, an estimated freight charge and estimated customs and duties charge needs to be obtained from the warehouse and emailed to the appropriate OTC.
- OTC must forward (via email) these estimated fees to the customer with a cc to Company @efpmail.com.
- Customer must respond back in writing that these charged are approved before the order is shipped out the door.
These steps need to be followed because the Company stores cannot compute accurate customs/duties and international freight charges. We had implemented this policy a couple of months ago because were running into a number of different orders where the customs/duties and freight charges were double and sometimes triple the cost of the goods. When we attempted to collect on these additional charges from our customer we received the following argument: “If had known at the time of purchase what these additional charges were, I would have never ordered these.” As a result we were forced to eat a number of these charges and as a result we implemented this policy.
Printing a commercial invoice for international shipments
A commercial invoice can be printed from PromoServe ONLY AFTER a dispatch/shipment has been triggered on the system. Let’s use the example of 50
ATTWWL2056 – AT&T Sphere Mouse Pads We want to ship them overseas.
On entry to the Warehouse & Shipping screen the following orders are listed at present (see below).

Notice at present our In-Stock Sales Order appears but there is also Drop-Ship orders also listed that is completely irrelevant to the warehouse. Therefore, when the warehouse uses this routine, they should ensure that the ‘Shippable Only’ checkbox is ticked. This will only display In-Stock sales orders where stock currently exists to fulfill the orders. When checked the screen will look similar to the below.

In order to process the order we advise to begin with a Picking Note. A Picking Note is printed via the printer icon (bottom right of the Warehouse & Shipping screen). When printing a Picking Note always use “Format A” and “Print with Header”, as shown below towards the bottom right of the screen shot. When the goods are ready to be shipped, a warehouse operator will click on the green checkmark button (bottom right) below.

The following screen will then be displayed.

At this point this point the Kewill system will be introduced – the order is shipped and tracking numbers are entered within the section below. When using this routine manually, tracking numbers should be entered in the 2 fields below. If additional tracking numbers exist they should be entered in the ‘Additional Text’ box below.

Now that the mouse pads have been “Dispatched & Invoiced you need to create the Commercial Invoice to ship them overseas. Please follow the instructions below.
Go back to the Warehouse & Shipping button on your main menu in PromoServe.
On selection, enter the sales order number in the search field and click TAB.
Double click on the order that has already been shipped according to the system. See below.

On selection the following screen will then be displayed.

Click on the Header Tab - ![]() and enter the Airway Bill Number in the Tracking 1 field.
and enter the Airway Bill Number in the Tracking 1 field.
Enter the Country of Origin in the Tracking 2 field using the magnifying glass as shown in the below screen shot. (You can find the Country of Origin for the in stock product under the Notes tab of the product in the Stock Database. The Stock Database button is found on the main screen of PromoServe. Enter the in stock product number in the search field and hit TAB. Double click on the product line and click on the Notes tab where you will find the Country of Origin).

Once the Airway Bill Number and Country of Origin are entered, click on the ‘Printer’ Icon, bottom left of the screen. Ensure you have made the following selections before printing the commercial invoice (see below).

Click on the blue checkmark button and you will then be prompted with the standard print routine.
Section 14
Stock takes
Policies Regarding Stock Takes:
Before explaining how to do a stock take in PromoServe. The following guidelines must be adhered to in order for the stock take to work and Company to receive accurate inventory numbers.
1) A stock take should only include up to 30 items so that the take can be opened and closed within one business day.
2) While a stock take is open, the warehouse can NOT receive in replenishment POs for those particular items nor can then physically ship out orders for those items until the stock take is closed. (This avoids the double-dipping issue encountered during Stock Take #4 (12/29/13 – 1/15/14).
3) Before opening the stock take, warehouse should notify warehouse employees and Company employees that a stock take is taking place and what items are included in the take. The announcement should also remind the warehouse and Company that no replenishment POs will be received and no orders will ship out during this stock take.
How to Perform a Stock Take in PromoServe:
PromoServe has its own inbuilt Stock Take function. The idea is to basically commence a Stock Take for ALL Products, a range of Products and then print out ‘Count Sheets’. The Count Sheets detail the expected Stock Quantities held in PromoServe and allow a warehouse operative to label any discrepancies in the items when they perform the count. Any discrepancies uncovered when the physical count has been carried out are then entered back into PromoServe – the Stock Take is then committed and PromoServe is fully up-to-date.
The Stock Take routine can be located within the Stock Database – bottom right of the screen


To start a Stock Take you need to click on the ‘Stock Take’ button, the following screen will appear

This in time will list all previous stock takes and their status, to start a new take, click on the ‘Blue +’ button, bottom right of the screen. The following screen will then be displayed

The top section of the screen – will display details about the Take as you progress through it

these boxes at the top are explained below
Count number this is a sequential number which increases by one every time you start a new take.
Items on file the number of products in the database.
Items in count this box is filled in after the filters have been set, and tells you how many products will be included in the count
Expected value this how much the system has calculated the value of your stock is worth
Count date the date the count was started
Items counted/counted value these boxes are filled in when items have been entered in
The other boxes are discrepancy boxes which are filled in automatically if the value differs from the expectant values.
The lower part of the screen allows you to filter the Stock Take. For example if the Product and Category Settings are left blank, the Stock Take will output the whole Product Database. Therefore a common technique is to use the ‘From and To’ Category function

Point to Note – you may want to uncheck the ‘No movement since’ checkbox to ensure you output every product in the given Category range.
Example – Screen settings to output all the AT&T In-Stock Product Range

To select your product or category range you would click on the ellipse button to select them, if you leave them blank as mentioned above then all products and categories will be included in the count.
Tip – We are about to print out ‘Counting Sheets’ for the stock – Notice how you can change the sequence of Products to be displayed on the Count Sheets by selecting one of the below radio buttons
![]()
Once you are happy the filters are correct then click on ‘Pre-View’ button located at the bottom left of the screen. This will analysis the database and work out which products are going to be included on the count, A screen similar to the below will then be displayed

This is a screenshot of the potential Count you are about to make. It lists the products that are applicable to the filter you have set. Therefore, if this screen appeared blank, you must have a problem with your filter settings.
To Continue with the ‘Stock Take’ – Click on the ‘X’ button, bottom right of the screen
You will then return to the ‘Adding Stock Take’ screen, click on the ‘+’ button that has now appeared bottom right of the screen as circled below
![]()

Once you click on the ‘+’ button – in order to print out Count Sheets (to be used by a warehouse operative to annotate any discrepancies on). Click on the ‘X’ button, bottom right of the screen. You will now return to the ‘Main Stock Take’ screen – Notice how a Stock Take Line now appears.

Click on the ‘Count Sheets’ Printer button, bottom left of the screen, the below will appear

to print the ‘Count Sheets’ click on the Printer Icon. They will look similar to the below

The idea therefore is for the warehouse operative to annotate on these sheets any differences in the Counted Quantity (True Warehouse Quantity) and the Expected Quantity. For the remainder of this help guide we will assume that the count for Product 1805ATTWHT2T was actually 5 & 1805ATTWHTLG was actually 15.
To enter these Count discrepancies into PromoServe you now need to hit the magnifying glass bottom right of the screen as circled below

![]()
 The following screen will then appear.

The next step is to begin to enter any recorded discrepancies recorded on the Count Sheets. To do this click on the ‘Take Item Details’ Tab, top right of the screen, as Circled above.
The below screen will then appear

Tip – I tend to advise clicking on the Set Counted = Expected Button, on selection the whole Counted Quantity column is automatically set to the Expect Quantity. Your screen will look similar to the below

The next step is to double click in the Counted Quantity Column Cells whereby you need to change the actual Counted Quantity. Therefore in our example
Product 1805ATTWHT2T was actually 5
Product 1805ATTWHTLG was actually 15
Your screen will look similar to the below

IMPORTANT NOTE – notice how some product entries have more than one line entry – this is due to them being held in separate Bin Location line entries.
Tip – AT this point you can check the ‘Show Discrepancies Only’ checkbox – this will filter the screen allowing you to check you amends against your Count Sheets – E.g.

Once you have completed the Count Sheet discrepancy entries click on the Check Mark – bottom right of the screen. You will now return to the main ‘Stock Take’ screen – notice how the Status has changed to ‘Quantities Entered’

To ‘Commit’ the Stock Take and update PromoServe Stock Levels – click on the ‘Magnifying Glass’ bottom right of the screen, the following screen will then be displayed:

Click on the ‘Commit’ button – bottom left of the screen – the below screen will then appear

Here you can see that 2 Discrepancies were identified that a difference of $209.05. So I read this as after this take - $209.05 worth of stock was found and added to the system
IMPORTANT – Notice how ‘Is this the last part of the take’ is unchecked – this is because you do not necessarily have to enter all counted quantities in one go. You can always return to a Stock Take if required.
In this example I am going to tick this check box to indicate to PromoServe that the Stock Take is Complete

Finally Click on the ‘Blue Arrow’ bottom left of the screen
The following screen will then appear

Click on the ‘Yes’ button to commit the Stock Take. A Status bar will then appear – once it has finished – Click on the ‘X’ button, bottom right of the screen – you will now return to the ‘Main Stock Take Screen’. Notice how the Status has changed to ‘Take Committed’

The Stock Take procedure is now complete. Product quantities in the system will have been amended accordingly.
Section 15
Putting Products with Zero Stock Quantity in Test Mode or No Longer Available in PromoServe
Procedures for Test Mode:
If a product is showing 0 in stock, please uncheck the Price List Product only box on the product tab.
Then please email the brand merchandiser and the e-Store Admin:
Add emails here
In the email subject line please use the following format:
Item # - TEST
For example CIT12345-TEST
The e-Store Admins will then need to do a product update via PS or if the product is a Citi, AON or Moto product, and the product will need to be put in Test through the CX store.
Procedures for No Longer Available Mode:
If a product is showing 0 in stock and the Notes tabs states DWO, please uncheck the Price List Product box and place a checkmark in the No Longer Available box on the product tab. The item will then appear red in the stock database. ***Please note: if the product is apparel with size options and all the size options are checked as No Longer Available, please make the generic branded product code No Longer Available as well. Otherwise, the product still shows on the store but the customer will not have any size options to choose from.
Then please email the brand merchandiser and the e-Store Admin:
Add emails here
In the email subject line please use the following format:
Item # - NLA
For example CIT12345-NLA
The e-Store Admins will then need to do a product update via PS or if the product is a Citi, AON or Moto product, and the product will need to be put in Test through the CX store.
Section 16
Notification to customers of back orders or discontinued items
At 6 a.m. next business day, an auto report will be sent to the warehouse listing not only backorders that have occurred from the previous day but also orders received that can be shipped as sufficient stock exists in the warehouse. This report focuses on:
Sales orders received the previous day that can be shipped and orders listing products that have a negative free stock quantity (indicating a back order situation) from the previous day.
This report will be sorted automatically so the negative stock quantity lines items (backorders) will be at the top of the list so the warehouse can focus on those first. If there are no negative stock quantities listed on the report that means there are no backorders.
With this information the warehouse can inform the customer with the back order details and expected delivery date, allowing the customer to choose whether to proceed with the order. This auto-report will be set up by Stacy Mosca at Company. If any changes need to be made to this report, please notify Stacy at (emailaddress@email.com). An example of the report pulled from PromoServe is detailed below for reference.

Once the warehouse is aware of a back order situation via the automatic back order report received from PromoServe, the warehouse must follow the instructions below.
IF ITEMS ARE ON BACK ORDER:
- Warehouse notifies customer by email and ALWAYS copies the appropriate Company OTC so the communication can be logged in the Company system:
Add emails here
Send the below email to customer and Company OTC:
TO: Customer
CC: Company OTC
FROM: Company Warehouse
SUBJECT: AT&T e-Store - BACK ORDER – SO# 1234567
Dear Mr. Smith:
Thank you for your order from the e-Store. We regret to inform you that we do have a back order on product #xxx for a quantity of XX. We expect to fill and ship you’re back ordered item(s) to you on MM/DD/YY.
Please let us know if you would like to wait for the backorder or cancel the backorder. If you prefer we cancel the backordered items, we will credit that portion of your order. You can then visit the e-Store to find an appropriate substitute.
We do apologize for this inconvenience.
Sincerely,
The Company Fulfillment Center
Fulfillment Center Phone Number
Fulfillment Center Email Address
TIP – To find the estimated ship date of backordered items, refer to the outstanding PO that the warehouse will be receiving in to cover the backordered items (see the future state screen in the Stock Database for POs cut for the product). For example, if the PO is due to be received in to your warehouse on 11/10/14; allow yourselves a day to book into stock. Inform the customer that you will ship it to them on 11/12/08.
CUSTOMER WANTS TO WAIT FOR THE BACK ORDER:
- When items are available in stock to ship again for this backorder, the sales order with then appear again in the Warehouse “Shippable Only” screen. It will appear at the bottom of the list. The warehouse should always work bottom up on their list of orders for that day (from oldest to newest).
CUSTOMER WANTS TO CANCEL THE BACKORDERED ITEMS:
Send an email to the Company Credits department and cc the Company OTC. Please note that Company has a credits team for each client so be sure to include the appropriate credits distribution list. They are listed below.
Enter emails here
Please forward the client’s response using the below format.
TO: Company Credits
CC: Company OTC
FROM: Company Warehouse
SUBJECT: Fwd: AT&T e-Store BACK ORDER - SO # - back ordered items needs to be credited
Dear Company Credit Department:
Product # for a quantity of XX is on back order. The customer would like to cancel this product # for 20 and receive a credit.
Thank you.
The Company Fulfillment Center
Company Credit Department, please do the following:
The Company credit department will create a credit note and credit the customer’s credit card or remove the items from the customer’s Purchase Order (On Account) so they are not invoiced for the cancelled items. This will remove the sales order from EF’s ship list.
If the purchase order (On Account) is already printed, the Company credit department will apply a partial credit. The Company credit department will need to write off the stock allocation in PromoServe to balance the system. This will remove the sales order from EF’s ship list.
IF THE ITEM IS DISCONTINUED AND WAREHOUSE DOES NOT HAVE ENOUGH TO FILL THE ORDER (limited quantity available and Company will no longer order the item once bin is empty).
Company Warehouse, please follow the instructions below.
- To find out if the item is discontinued, visit the Stock Database. Enter the product item number in the search field and click the TAB key. Double click on the product line to open up the product information card. Click on the Notes tab to see if notes of discontinuation are entered (aka DWO).
- The warehouse will send an email to the customer cc’ing Company OTC as shown below.
TO: Customer
CC: Company OTC
FROM: Company Warehouse
SUBJECT: AT&T e-Store – DWO- SO #1234567 - product is discontinued from the collection
Dear Mr. Smith:
Thank you for your order. Please be advised that Product # is discontinued from the core collection on your e-Store. This means that we have limited quantity left in stock and will not be replenishing stock. Of your order, we can fill XX of the item.
We will credit your order for the remaining balance of the product that cannot be shipped to you. The Company Order Traffic Control department will be contacting you shortly to offer their assistance in finding a substitution.
Thank you.
The Company Warehouse
Fulfillment Center Phone Number
Fulfillment Center Email Address
TIP - DWO = done when out
The Company Warehouse will send an email to the appropriate Company Credits department and cc the appropriate Company OTC. Please follow the instructions below.
TO: Company Credits
CC: Company OTC
FROM: Company Warehouse
SUBJECT: Fwd: AT&T e-Store DWO - SO # - DWO items needs to be credited
Dear Company Credit Department:
Product # is DWO. Please credit the customer for product # for quantity XX. Warehouse cannot fill this portion of the order as item will not be reorder for stock.
OTC – please contact customer to see if you can help them find a substitute to order off the store.
Thank you.
The Company Fulfillment Center
Company Credit and OTC Department, please do the following:
- The Company credit department will apply the credit to the sales order and will write off the stock allocation in PromoServe so the system is in balance. This will remove the sales order from the warehouse’s ship list.
- Company OTC will notify the merchandiser to immediately remove the DWO item from the store and list it as No Longer Available since the item is sold out and will not be reordered.
- IF customer wants a substitute for the quantity of the discontinued product that cannot be fulfilled, Company OTC will contact the customer and find an appropriate substitute. Customer will then place another order on the e-Store.
Section 17
Order cancellations
OTC - If a customer notifies you that they want to cancel in stock products on an order please do the following.
Put the order on Held status. To do so please follow the instructions:
Double click on the sales order line item to open up the sales order and click on the Shipping/Payment tab as shown below.
Click on “Hold Dispatch” to put the order “On Hold” and in the Notes field enter:
Customer requests to cancel the whole order or certain products in the order (list product # and quantity as well as the date the customer notified you).

Company OTC will then send the following email:
The email format is as follows:
TO: Company Credits
RE: CANCEL – SO# 4001537
Dear Company Credit Department:
Please cancel product code # and quantity XX per the customer.
Thank you
Company OTC
The Company Credit Department will do the following:
The Company credit department will remove the order from Held status and apply the credit to the sales order and will write off the stock allocation in PromoServe so the system is in balance. This will remove the sales order from the warehouse’s ship list.
IF a credit card has been charged, the Company credit department will issue a credit memo in PromoServe and refund the customer’s credit card. The Company credit department will need to send a confirmation email to the customer that their credit card has been credited. The below template will be used.
Dear Mr. Smith,
This is to confirm your order cancellation. We have credited your credit card in the amount of $__.
We look forward to your next order for your branded merchandise needs.
Company International
Section 18
Returns
At times, a customer will notify Company that they would like to return an item(s). Please note Company’s return policy:
Company accept returned merchandise ONLY if the product is damaged upon receipt, the item is defective (quality of merchandise does not hold up to manufacturer’s quality standards) or the incorrect type of merchandise was shipped in error. This can include the incorrect color, size, quantity or just outright the incorrect product). All other reasons for returns will not be accepted.
Defective products may be returned up to 30 days from ship date. Please contact returns@Company.com for a Return Merchandise Authorization Form (RMA) and RMA number.
Company warehouse personnel and Company vendors cannot accept any returns without an approved RMA number.
Credit is issued based upon Company terms and conditions. Any discrepancies in billing, shipping, or receipt of goods must be made within 30 days from order ship date or claim(s) will not be honored.
Company reserves the right to charge a 15% restocking fee on all returns, which we will waive at our discretion.
If the customer notifies the warehouse that they would like to return an item, the warehouse will need notify the returns department/OTC via email.
Note: Company has client specific Returns email distribution lists. These email distribution lists include Said user (credits/returns) as well as the OTC team member for that account. A list of the Returns email addresses are below:
Enter Emails Here
Warehouse will need to send an email to the proper Returns distribution list and cc the customer as shown below.
TO: Company Returns
CC: Customer
FROM: WAREHOUSE
RE: AT&T e-Store – RMA -SO# 4001537
Dear Company Returns Department,
Customer would like to return product # with a quantity of XX. Please send an RMA form to this customer as soon as possible.
Thank you.
Company Fulfillment Center
- The Company returns department will reach out to customer with an RMA form and charge the customer a 15% Restocking fee at Company’s discretion.
- Please note: Warehouse can NOT accept a return without a Company RMA form included.
- Warehouse inspects the return. If item is in good condition, physically add it back to the bin and add the quantity back into PromoServe. To manually add a quantity back into PromoServe please follow the instructions below
- Visit the Stock Database
- Search for the Product number and hit TAB
- Double click on the line item
- Click on the Stock Details tab
- Click the Blue + button
- Enter the quantity in the Quantity field
- Click the blue checkmark
- Manually type in reason (i.e. returned item)
This will update the free stock quantity on PromoServe so other customers can order the available product.
- If item is in bad condition/damaged and cannot be added back to the Free Stock Quantity, please send an email to the appropriate Company returns department/OTC and cc the customer. Please use the below template.
TO: Company Returns
CC: Customer
RE: SO# 4001537 – Return with damages
Dear Company Returns Department,
Customer has returned product # for a quantity of XX. However, upon receipt of the return, our inspection indicates that these products have been (enter reason here – worn, damaged, etc.) and cannot be added back to stock.
Thank you.
Company Fulfillment Center
- The above message will notify returns NOT to credit the customer for the goods returned since they are in poor condition.
Section 19
Exchanges
If the customer notifies the warehouse that they would like to exchange an item, please follow the instructions below.
Warehouse will need to send an email to the appropriate Company Returns email distribution list/OTC and cc the customer as shown below
TO: Company Returns
CC: Customer
RE: SO# 4001537 – Return Request
Dear Company Returns Department,
Customer would like to return product # with a quantity of XX. Please send an RMA form to this customer as soon as possible.
Thank you.
Company Fulfillment Center
- The Company returns department will reach out to customer with an RMA form and charge the customer a 15% Restocking fee.
- Please note: Warehouse can NOT accept a return without a Company RMA form included.
- Warehouse inspects the return. If item is in good condition, physically add it back to the bin and add the quantity back into PromoServe. To manually add a quantity back into PromoServe please follow the instructions below
- Visit the Stock Database
- Search for the Product number and hit TAB
- Double click on the line item
- Click on the Stock Details tab
- Click the Blue + button
- Enter the quantity in the Quantity field
- Click the blue checkmark
- Manually type in reason (i.e. returned item)
This will update the free stock quantity on PromoServe so other customers can order the available product.
- While waiting for the return, the warehouse can notify the customer that they need to place an order on the e-Store for the item they would like in exchange for the item they want to return.
- Once the original item is returned in the warehouse and it is in bad condition/damaged and cannot be added back to the Free Stock Quantity, please send an email to the appropriate Company returns department and cc Company OTC and the customer. Please use the below template.
TO: Company Returns
CC: Customer, Company OTC
RE: SO# 4001537 – Return with damages
Dear Company Returns Department,
Customer has returned product # for a quantity of XX. However, upon receipt of the return, our inspection indicates that these products have been (enter reason here – worn, damaged, etc) and can not be added back to stock.
Thank you.
Company Fulfillment Center
Section 20
Warehouse picking note errors
We know that everyone is human and that at times, picking errors will occur. If this situation arises, please follow the instructions below.
We will use product ATTWWL2056 - AT&T Sphere Mouse Pad as an example and that the customer contacted Company OTC stating that according to the Shipping Note, 5 mouse pads were included in the shipment. However, the customer only found 3 in the box. This means that 2 were not shipped. The transactions area under this product will show that all 5 shipped to the customer. After further research, the warehouse confirms this was a human error or picking error. At this point, please follow the instructions below:
Company OTC will make a note in the Sales Order in the Notes field that customer claims 2 mouse pads are missing from the shipment.
Company OTC will send the following email to the warehouse:
TO: Warehouse
FROM: Company OTC
SUBJECT: SO# - Short Shipment
Dear Warehouse:
Customer contacted us stating that they only found 3 ATTWWL2056 - AT&T Sphere Mouse Pads in their shipment. Please ship out the remaining 2 to this customer.
Thank you.
Company OTC
Warehouse researches and confirms it was a picking error. At this point, please follow the instructions below.
- Click on Stock Database in the main menu of PromoServe
- Enter the in stock product number in the search field and click TAB
- Double click on the in stock product line item to open up the product information card
- Click on the Stock Details tab and your screen should appear like the below

- Click the blue + button and to open up the “Insert Stock Record”

- Add 2 in the quantity field. You need to do this so that PromoServe adds the “missing 2 pieces” back to stock.
- Click the blue checkmark.
- A “Reason” screen will appear before you close out.
- Enter your reason: Picking error (ADD SO number)
- Click the blue checkmark button
- When you go back to the Product Details tab of the product, your physical stock field should be increased by 2 pieces.
- Company OTC will place a sales order (free of charge) for the “missing” 2 pieces and the warehouse will process the sales order just like they do for all incoming sales orders.
Section 21
Changing a customer’s ship to address in an existing order
- Visit Sales Orders (main screen on PromoServe
- Enter your sales order number and click the TAB key
- Double click on the highlighted Sales Order
- Click on the Shipping/Payment tab, and you will see the following screen:

- Click on the magnifying glass
 next to the Shipping Address Box
 - This pulls up the following box where you will click on the blue triangle to add an alternate address for this order:

- Type in the additional address and click on the blue checkmark to save the address change.
- Please include in the Notes tab of the order that you made a change to the ship to of the order. Include your first initial and last name.
Section 22
Changing a ship method on an existing order
- Go to Sales Order database (main screen on PromoServe)
- Enter your sales order in the search field and click the TAB key,
- Double click on the highlighted line item and
- Click on the Shipping/Payment tab, and you will see the following screen below:

- Click on the magnifying glass next to the Special Instructions box (where a ship via is listed).
- This pulls up a table of ship via methods. Make sure to select the ship via that goes with the customer you are selecting. (Notice how it lists FEDEXAT, FEDEXBP, and FEDEXSL under the Phase Text column as shown below.

· Double click on the selection
· Click on the blue checkmark
· Please include in the Notes tab of the order that you made a change to the ship method of the order. Include your first initial and last name.
Section 23
Tracking number requests from customers
If a customer calls or emails Company OTC requesting tracking information on an In Stock order, OTC will access the in stock order tracking numbers by following the instructions below
- Click on Sales Orders, Invoices & Shipping on the main menu of PromoServe.
- Click on Warehouse & Shipping. Enter the sales order in the search field and click the TAB key.
- Double click on the sales order line item and you will see the below screen

- Click on the Header tab and you will see the below screen. You will find the tracking number(s) in the Tracking Details (see example below).

If Call or Email Comes to Company:
If the order has shipped, then the tracking numbers will be available to OTC. OTC will then email the customer the requested tracking numbers and provide them via phone if requested.
If the order has not shipped, Company OTC will transfer the call or email to the warehouse and the warehouse will then provide a status update to the buyer.
IF Call or Email Comes into the Warehouse:
If a customer calls or emails the warehouse requesting tracking information on an In Stock order, the warehouse will access the in stock order tracking numbers by following the steps below:
- Click on Sales Orders, Invoices & Shipping on the main menu of PromoServe.
- Click on Warehouse & Shipping. Enter the sales order in the search field and click the TAB key.
- Double click on the sales order line item and you will see the below screen

- Click on the Header tab and you will see the below screen. You will find the tracking number(s) in the Tracking Details (see example below).

If tracking is available, the warehouse will email the customer and cc: OTC the requested tracking numbers and provide them via phone if requested.
If the order has not shipped, the warehouse will provide an update via email and/or phone to the customer.
Remember – email format as follows:
TO: Customer
CC: Company OTC
RE: TRACKING NUMBERS – SO# 4001537
Dear Mr. Smith:
Your sales order # for product #, quantity XX has shipped. The tracking number(s) are:
XXXXXXX
XXXXXXX
Thank you for your order.
The Company Fulfillment Center
Section 24
Notes with regards to contacting a Company customer
- When an email is bounced back to the warehouse, the warehouse should send that email to the Company OTC group. OTC will contact the customer via phone.
- Any email addresses that do not end with @att.com are subject to suspicion. The user name located on the order shows the probable email address of use (i.e. if the user name is: jk2256, it would mean their email is jk2256@att.com)
- If customer can not be reached by email, the warehouse can also call the customer concerning order issues. Phone number is listed on the order.
- Questions that can only be answered by the warehouse should be emailed to the warehouse. We should be directing the customer to those who can offer the quickest resolution.
- If no email address or phone number is provided, or if you have any problems contacting the customer—please let the Company OTC group know.
