How to Update to 2018 Banners
As you will have noticed, your website comes complete with a number of pre-set banners which are already part of the system. If you had a website with us in 2017, these will still contain the 2017 banners that were part of that years Spectrum catalogue.
As you can imagine, these will now need replacing with the banners for the 2018 year. As the banners are considered added content, this needs to be completed manually. The following help sheet aims to map out this process to make it as quick and as painless as possible.
STEP 1
First you will need to get logged into the management section of your website as you would do normally. For reference, you can do this by heading to the address of your website, and adding ‘/manage’ onto the end of the address
For example: http://customerfocus.uk.clickpromo.com/manage
STEP 2
Once logged in, we need to jump onto the page that contains the banners. Generally speaking, this will be the home page, although if you manually added banners to any other pages these will also need replacing.
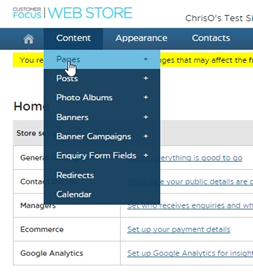
Using the home page as an example, head to Content > Pages from the management homepage and search for the page title, i.e. ‘home’. When you’ve located the page, click ‘content’ for that respective page.

STEP 3
Once on the page editor, locate the module that contains the banners. This will be denoted by the title ‘Banners’. Once this has been found, hit the pencil icon in the top right of the module to go to the module editor.

STEP 4
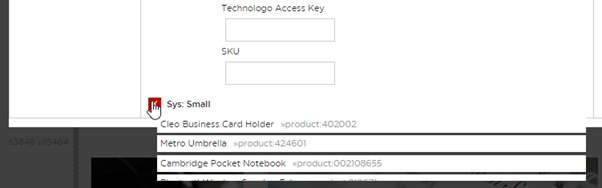
You will be greeted by a popup similar to the below:

You will notice a list at the bottom of this popup, with titles and links alongside a red ‘cross’ icon. These are the banners that are currently appearing in this module. First, we need to remove the current listings, so hit the red ‘x’ for each of the entries
Note: If you don’t see a red x next to an entry, this is a sub-listing and can be removed by clicking the red x on the entry above.
STEP 5
Once the list is clear, you can add all of the 2018 banners at once. From the ‘Campaigns’ drop-down menu, select ‘biab2018 small’ for the smaller banners, or ‘biab2018 big’ for the page-wide banners.

NOTE: It is recommended to only use one of these campaigns in each module, due to the varying size. If you wish to include both, add an additional module to add the other campaign. If you’re unsure how to add a module to a page, you can find a help sheet on the process here.
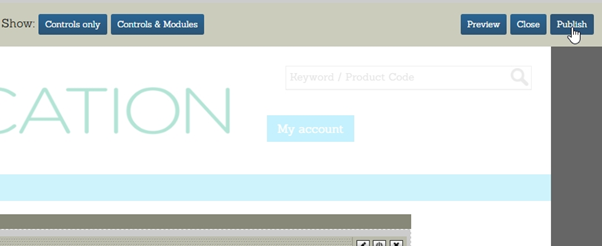
From this point, simply hit ‘save’ on the window. Once back in the page editor, you can use the ‘preview’ button to check the banners are appearing correctly before publishing your changes to the public. If you’re happy, you can then go ahead and click the ‘publish’ button on the page editor to make your changes live!
